Archives for July 2009

Finger Lickin’ Dippin’ Good

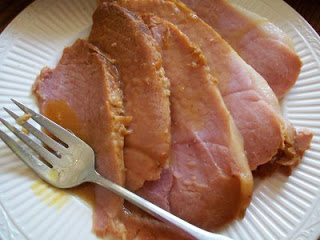
Tonight was the first night of our “staycation” so we celebrated with what my DH termed “very appropriate vacation food”. I’m not sure what makes it so perfect for a vacation, except maybe that it’s casual and fun? There’s just something very child-like and delightfully improper about finger foods, don’t you think?

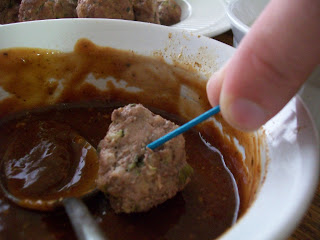
The meal started with meatballs and mushroomed from there. I decided that it would be fun to dip the meatballs instead of serving them in a sauce, and from there I decided that a finger foods meal would just be fun. If you have kids, this is a great meal for them. And who knows, you might even get them to eat some veggies they’ve never tried before just because of the dip factor!

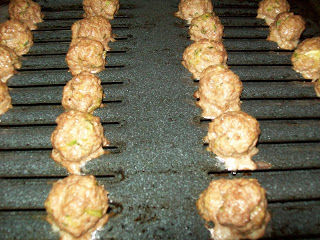
I used a meatball recipe I had clipped from a magazine (Woman’s Day, I think) and made some alterations to it. I kept the basic recipe but added shredded zucchini (I always sneak vegetables in wherever I can!) and used green onions instead of regular.


While the meatballs are cooking, you can make some dips to go with them. I made two different dips, Old Bay Barbecue and Lemon-Herb Yogurt Dip.

I found the Lemon-Herb Yogurt Dip recipe in the All You magazine (available only at WalMart). It’s not on their website, but here is my version (I halved the original recipe and left out some ingredients):


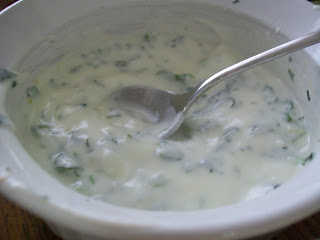
I thought this dip went very well with the meatballs, and I think it would also go very well with fresh vegetables.

I found the other recipe on www.allrecipes.com, my favorite go-to site when I need a recipe and fast! Actually, this particular recipe I had found a year or two ago, and written down in my own recipe notebook because I liked it so much. It’s a good thing I wrote it down because now I can’t find it.

By the way, Old Bay is very much a Maryland thing. If you live elsewhere, you may not have heard of it and you may not even be able to find it in your regular grocery store. But hunt it down, because it’s totally worth it! It’s the most unique blend of spices, and it’s perfect on all sorts of stuff, especially crab cakes (it’s what makes a Maryland crab cake a Maryland crab cake) and Boardwalk french fries. Oh, yum! I’m out of it now, so I need to go get some more!
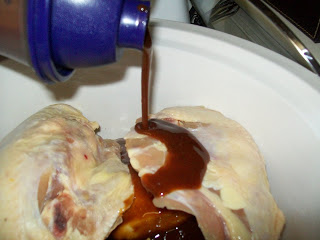

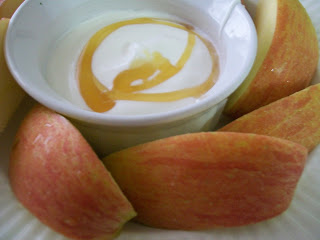
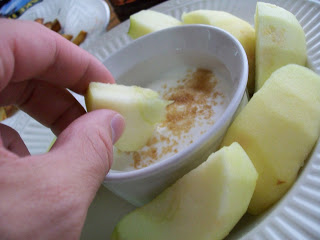
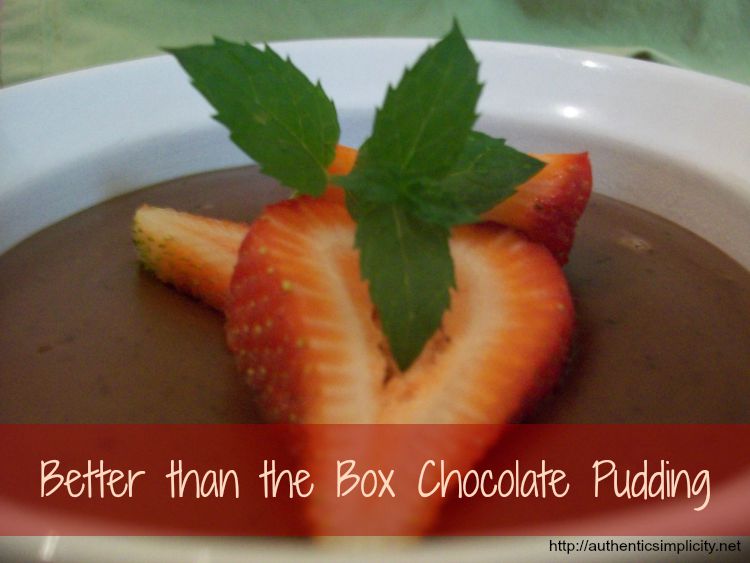
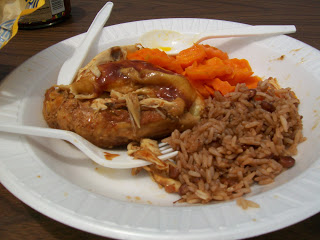
For sides, I served home made French fries and apples with dip. For the dip, I used my new favorite Yogurt “Pudding” recipe. I’m obsessed with that stuff! It’s so easy, and so yummy!

Jumbles, Plunkets, and Cry Babies

Otherwise known as cookies. And no, I didn’t make it up! It’s true: in Colonial days, cookies were called a variety of names, among them “jumbles”, “plunkets” and “cry babies”. If you don’t believe me, check out this page at Whats Cooking America.

The history of cookies is actually pretty fascinating. They seem to have been around since sugar was discovered in the 7th century in Southeast Asia. Seems like a good use of sugar to me! They have always been considered little cakes (in fact, the English word “cookie” comes from the Dutch word “koekje” which means little cake), and in old cookbooks the cookie recipes are found at the end of the cake chapter. Some people say that cookies were invented because ancient cooks used small amounts of cake batter to test the oven temperature. While many hundreds of thousands of cookie recipes exist (and more invented all the time), the same basic recipe has never changed: flour, sugar and fat.

Hmmmm. Not exactly the healthiest combination ever. Hence I have been on a never-ending quest for a “healthy” cookie recipe, with some success. But a cookie is a treat, you say. It’s not supposed to be healthy. At least that’s what my husband says. But the point of food is to nourish your body, right? Even if it’s “fun” food, it should still have some nutritional benefit. And besides, if it’s healthy, you can eat more! (::wink:wink::)

Most of my “healthy” cookie recipes have involved oatmeal. That’s because it cuts down on the amount of nutritionally deficient white flour, and also works well with healthy ingredients like apples, bananas and honey. I don’t even remember where I came across the recipe I used today, but I’ve made it several times, and it always turns out a perfect cookie, even with my alterations.

So I’m confident that even if you normally buy cookies or cookie dough instead of making them yourself, you can make these cookies. This is a trusty, fool-proof (not that you’re a fool…) recipe! And yummy, too! I can’t stop eating them, so it’s good they’re healthy, at least a little bit.


Go ahead. Eat a few.


Yogurt “Pudding”

Yogurt Pudding #cleaneating #refinedsugarfree #quickandeasySometimes the simple things in life are best. Like this yogurt “pudding” recipe I found at Stonyfield Farms website. Yes, I know, I just did a pudding recipe last week, but this one is different, I promise.

For one thing, it’s more like a topping than a pudding. In this case, it’s used as a topping for fruit, but you could use it on pancakes or waffles or even granola! I’ve enjoyed it as breakfast, dessert and even a mid-morning snack! It’s so delicious, but it’s sooooooo easy… and healthy, too! You may have noticed that’s the sort of recipe I love - quick and easy, cheap and healthy!

First of all, I whipped some cream in the mixer until it had firm peaks. I didn’t really measure how much cream, but it was probably about 1/2 a cup, which ends up making 3 or 4 servings of topping.


Then I turned the mixer down to “stir” and added in 1/2 cup of yogurt.


Then I sliced 1 banana and 4 strawberries, layering them in a glass jar like a parfait. You can use whatever fruits you want. Any combination of berries is perfect, and peaches are yummy too.


Then I spooned some of the pudding topping on top of the fruit and drizzle some honey over the top. The original recipe calls for turbinado sugar, which is also yummy and adds a little bit of sweet crunch.

What’s not to love?


5 Things to do with Nasty Bananas… if you dare!

Lovely, isn’t it? That’s what was staring up at me from my counter top the other day. I had bought a package of “beyond their prime” bananas at a great price - $0.35/lb! - but hadn’t quite used them up yet, and now their “prime” was ancient history. So I challenged myself to find 5 quick and easy things to do with bananas that did not involve banana bread or pudding.

1. Smoothie
OK, so kind of lame. Nothing special about that. But it sure was yummy! One old banana, one package of peach yogurt, a splash of milk, and one ripe peach.

2. Peanut Butter Banana Sandwich
Mmmm… and oldie but goodie. First a toasted English muffin (whole wheat would have been better, but DH can’t eat a lot of whole grains, and I can’t afford to accommodate both of us at this point. One of these days, I’m going to be really good and make my own!), then some all-natural (no hydrogenated oils) peanut butter, then the banana sliced into quarters lengthwise, and a drizzle of honey on top.


3. Facial Mask
This was interesting! I mashed up a banana and mixed it with honey, then attempted to spread it across my face. I have to say, it was a pretty disgusting experience I will hopefully never repeat. I actually took a picture to show you what it looked like on my face, but it looked like maggots blew up on me, so I decided to spare you. I’ll just show you the mixture instead:


I have to say my face did feel refreshed afterwards, but Dh says it was because I was glad to have that gunk off of me!

4. Banana Cookies
I used this recipe which turned out really well. Letting the baking soda sit in the bananas for a while really worked: they were so light and fluffy! Too bad I made them for a church function and not for us!

5. Banana Ice Cream

Or more accurately, a frozen banana treat. It’s more like the consistency of an Italian Ice rather than ice cream. To make it, I froze one banana, then blended it with some coconut milk and honey.The original intent was to eat it immediately from the blender, but I put in too much coconut milk and it was too runny, so I froze it and ate it the next day instead. It was definitely delicious, so I’ll try again with a little less coconut milk!


So I still have one left. What should I do with him?

Better than the Box – Chocolate Pudding

Better Than the Box Chocolate Pudding One of my main goals on this blog is to prove to anyone who doesn’t believe me that cooking healthy foods from scratch is neither difficult nor time-consuming. Too many people think that cooking is either a great mystery they could never solve, or so time-consuming they would always be stuck in the kitchen. Instead, they rely on boxes (or bags or jars, or packages, you get the idea) that are quick and easy, but expensive and chock-full of unnecessary and unhealthy ingredients.

There’s a better way!

You don’t have to be a gourmet and spend hours over your creations in order to serve healthy delicious meals to your family. So throw away the box and make something from scratch for a change. If I can do it, you can do it!

For example, chocolate pudding. For a long time, I never even ate pudding because I didn’t want to use the mix found in a box, but I thought that home-made pudding was too time-consuming and difficult. Then my diet was forcibly changed because of my son’s allergies: there were so many foods I couldn’t eat, that I began to think outside the box (literally!) for foods that I could eat. I thought I had kissed chocolate good-bye for a while, until I found an allergen-free recipe for chocolate pudding. And I realized that it was so quick and easy, I could make it any time I needed a chocolate fix.

Once I discovered that, I branched out and made all kinds of pudding: butterscotch, vanilla, coconut, etc. I used them to make trifles and parfaits for desserts to serve to guests. And the best part was, it was every bit as easy as using a box!

But not as QUICK, you say. Almost as quick, I say. It took me approximately 10 minutes, start to finish. Anybody can find 10 minutes in their day to fix themselves a chocolate treat!

I thought home-made pudding was hard, but it’s actually quite EASY. What makes it difficult is using an egg, because the egg(s) has to be tempered, or gradually heated so that it doesn’t cook before it’s thoroughly mixed in. That problem is easily avoided by not using an egg! You’ll find most pudding recipes require an egg, but as I discovered, vegans and food-allergic folks know that pudding without an egg is every bit as good. An egg adds richness to pudding. So if you want your pudding a little richer, go ahead and fuss with the egg. But if you just want some pudding, forget the egg. You won’t miss it!

It’s CHEAPer than buying the box. I bet you don’t believe me because those boxes are pretty cheap. Aside from the milk (which is not included in the box anyway), the ingredients in this chocolate pudding cost less than $0.40, even if you don’t buy them on sale.

It may not be HEALTHY, but it’s certainly healthier than what’s in that box. Have you ever looked at the ingredients? Sugar, modified food starch, cocoa, disodium phosphate, natural & artificial flavors, tetrasodium pyrophosphate, monoglyceride, diglycerides, Red 40, Yellow 5, Blue 1, Artificial Colors, citric acid, BHA. Yum. I don’t even know why they need all those food colorings, because, as Matthew McConaughey says in “The Wedding Planner”, “Chocolate’s already brown.”

Have I convinced you yet?


Once it’s reached the right consistency, remove from the heat and add the 100% chocolate bar and vanilla. At this point, you can get creative and try adding different things. For example, chocolate chips instead of the chocolate bar. Or different flavorings instead of vanilla. I have also used a mixture of coffee and milk to make a mocha pudding. Mmmm, that was yummy.

Pour the pudding into serving dishes and place in refrigerator to cool. If you plan on serving to guests, you may want to consider placing some plastic wrap tightly on the surface of the pudding while it cools to prevent a skin from forming. I don’t bother when it’s just for myself, or if I’m going to stir it up and use it in something else. Garnish as desired:

Better Than the Box Chocolate Pudding

Summertime…. and the livin’ is easy…

Lavender’s Blue Dilly Dilly

On a Crock Pot Kick

“I don’t think I’ve ever had ham cooked in a crock pot before,” said my husband.

“Hmmm,” said me. “Now that I think about it, I haven’t either!”

Said he, “Not that it tastes any different from ham cooked any other way…”

I am on something of a crock pot kick here. I don’t know if it’s the heat of summer (although it’s been pretty mild for this area) that keeps me from turning on the oven, the fact that I’m too busy chasing a Certain Little Someone around to spend any time in the kitchen, or just that I’m too lazy to cook anything in the oven. Probably all of the above, but mostly the last!

At any rate, I didn’t even consider any other method of cooking my VERY cheap ham (more on that later), so I set out to find a recipe for cooking ham in the crock pot… and that task was not as easy as I thought it would be! Every single recipe I found either:

*called for brown sugar (since I consider ham to be not-the-healthiest of meats in the first place, I didn’t want to make it worse by adding all kinds of sugar, as much as 2 cups!)
*called for marmalade or currant jelly (don’t have either one)
*called for pineapple juice (my DH can’t have that).

I was stumped. I just wanted a basic ham recipe that would add a little flavor, but not a lot of sugar. I surfed through pages and pages of Google results, and FINALLY found what I was looking for… at the website I usually go to first: Allrecipes.com. Don’t know why I didn’t go there first this time, but back to the main topic of conversation:

The recipe I used was called Honey Dijon Ham. It actually does call for brown sugar, presumably to help make the glaze everyone associates with ham, but only 2 TBSP, which meant I could leave it out more easily than with other recipes. Instead of brown sugar as the main ingredient in the sauce, this recipe calls for honey, a much healthier option. Just what I was looking for! It also adds some flavor with the Dijon mustard… yum!

So I happily put my ham in the crock pot:

A perfect fit!

I let it cook on low for an hour or so, and then I made my sauce/glaze, using 1/3 cup honey, a generous dollop of dijon mustard (I never measure stuff. OK, almost never. Usually only when I’m baking or if I want it to be perfect.), and some water.


I poured about half of the sauce over the ham, using my wonderful silicone basting brush to baste it all over the surface of the ham:


Shortly before removing the ham from the crock pot, I poured the rest of the sauce on the ham, and basted it again. I liked this method recommended by the afore-mentioned recipe. It allows the flavor to soak into the ham as it’s cooking, and it also gives a fresh burst of flavor right before you serve. The best of both worlds!

Here’s my cooked ham:


A beauty!

I used some corn starch and made the juice and sauce into a nice gravy which I poured over the ham slices before serving:


See how QUICK that was? I plopped the ham in the crock pot, took care of some household things, came back and made the sauce and basted the ham, then I took my Certain Little Someone to the Doctor for his 9-month check-up, came home and finished dinner at my leisure while the ham finished cooking in the crock pot. I probably spent a total of 15 minutes (at the most!) prepping the ham.

And so EASY. The crock pot does all the work. Except for slicing it. That was the hardest part.

And now my favorite part: IT WAS SO CHEAP! This is one of those deals-of-the-century that I’m going to be talking about for months to come. Ham was on sale for .57/lb at my favorite grocery store, and I had a coupon for $1 off any Smithfield ham, which was the brand on sale. Furthermore, another grocery store was offering “super double” coupons, which I could use at my favorite grocery store because they accept competitor’s coupons. The regular price for this 6lb ham was $7.00. With the sale, it was 3.42. Minus the 2 $1 off coupons, I paid a grand total of …. (drum roll) …. 1.42!!! For 6 lbs of ham!!! We had it for dinner tonight; we’ll have it for lunch tomorrow; and I’m sure to make at least one more meal with the ham itself, plus some soup with the bone! Not bad for $1.42!

And finally, it’s sort of HEALTHY. Ham is not the healthiest of meats, but I congratulate myself that I was able to find a recipe that at least added healthful ingredients TO the ham. Honey is the healthiest sweetener available, as long as you use it in moderation. And I rounded out the meal with fresh watermelon, carrots and roasted potatoes, so all in all, it was a relatively healthy meal, at least one I am not ashamed of!

So what’s the best deal YOU’VE ever gotten on a cut of meat? And how did you fix it?

Cheater’s BBQ

Cheater's BBQ in the Crock Pot #crockpot #slowcooker The crockpot has got to be the greatest kitchen invention of all time. Actually, it’s a toss-up between that and the dishwasher, but the crockpot might have just the slightest edge. Since I’m a cheapskate, I really love the crockpot because it uses less electricity than the oven and you can cook cheaper cuts of meat in it. And since I don’t consider myself a great cook, I also love that you can throw pretty much whatever in the crockpot and it will turn out fine! Or at least edible. Ha!

The crockpot is particularly useful for those occasions when you don’t have a lot of time to cook, especially right before it’s time to eat. Yesterday, to celebrate Independence Day, my church had “Dinner on the Grounds”, which is basically a good old-fashioned church picnic. Everyone was asked to bring a chicken dish and a side dish or dessert. Fried chicken is always a favorite, but I say what is the fourth of July without BBQ? The problem is that since church ends noon-ish and the picnic began at one, there wasn’t much time to actually prepare the chicken. I could have cooked it the day before, but then I still would have to warm it up, and a lot of other people have the same idea, so the line for the microwave and the oven can get pretty long. So I pulled out my trusty crock pot for some “Cheaters” BBQ.

I say “cheaters” because real BBQ is actually barbecued: grilled over a fire of some sort. But Cheaters BBQ is the only kind I have because I currently live in an apartment, and for some reason, they frown on using grills on your balcony!

But there’s nothing “cheater” about the sauce I used. BBQ sauce is one thing I never buy unless I can get it for super cheap (.50 or less) or free, because it’s so easy to make using basic ingredients that cost less than the jar of sauce. Also, when I make it myself, I don’t have to use HFCS (High Fructose Corn Syrup), which is an unhealthy sweetener used in the majority of store-bought BBQ sauces.

These are the ingredients I used for my Basic BBQ sauce:

Nothing fancy, just your basic, plain old barbecue sauce. Not that I have anything against fancier versions (I actually love trying all different kinds of BBQ recipes), but sometimes Quick & Easy is also the Best!

I poured the ingredients in the following proportions (This is an adaptation of a recipe I found somewhere online; don’t remember exactly where - if you know, let me know!) into my handy-dandy Tupperware Quick Shake Container (I use this all the time for sauces and marinades. It has a little disc at the top that helps to blend the ingredients.) or you can just dump it all into a glass jar:


I placed the chicken (any bone-in kind will do; I used split breasts) in the crockpot and poured the BBQ sauce over it:

I set the crockpot to cook on low for 8 hours, but it didn’t take anywhere near that long. I set it going around 8:00 in the morning, and it was perfectly cooked by 12:30. If I want it to take longer, I leave the chicken (or whatever meat I’m using) frozen.

BBQ in the crock pot is QUICK, aside from the time to cook in the crock pot. Five minutes max to mix the sauce and set it going, and then you can do whatever you want while the crock pot does its job!

It’s also EASY. It’s even easier than cooking on the grill, I think, although as I mentioned before, I don’t have a lot of experience with that!

It’s CHEAP, especially if you make a basic sauce or use an inexpensive store-bought BBQ sauce. I also used split chicken breasts, which I got on sale for .99/lb. (A lot of grocery stores have bone-in chicken deals a LOT this time of year.)

It’s also HEALTHY, particularly if you make your own sauce and use minimal amounts of salt and sugar. Making your own BBQ sauce also limits artificial colors and flavors, which can be found in store-bought products as well.

One more benefit of cooking in the crockpot is that the flavors really have a chance to blend together, more so than in other methods of cooking. This “Cheater” BBQ chicken was tender and flavorful, perfect for a Fourth of July picnic!

The Best First Food for Baby

I’ve met many internet moms who are savvy to this little baby food trick, but very few moms in real life have ever heard of it. Every time I mention it, I get strange looks that range in meaning from , “Wow, never thought of that!” to “um… why?” to “Are you sure that’s OK?”!

And yet, this is one of the most perfect baby foods available:

~It’s not very allergenic

~It’s fresh and unprocessed

~It’s high in healthy fats, which their little bodies really need

~It ranks right up there with sweet potato as a baby favorite

~It adds much needed variety to your little one’s diet - I’ve never seen it in a baby food jar!

I’m talking about avocado, of course. It may seem odd at first, but just give it a try and see if your little one will love it! My Certain Little Someone is very particular about taste and texture, and he gobbles up avocado like it’s candy.

Still need convincing?

Nothing could be QUICKer, not even a jar of baby food. All you have to do is slice it open, and grab a spoon.

It’s so EASY; if you can handle a knife, you can handle this!

It’s pretty CHEAP, too. At worst, it costs the same as a jar of baby food. At best, it’s cheaper. All depends on how much you typically pay for a jar of baby food (I personally try to buy it on sale with coupons and aim for less than .50 a jar) and how much you pay for the avocado. I don’t typically pay more than $1.66 for an avocado, and usually I pay $1.50. At least one grocery store in my area has it on sale on any given week. I usually get about 3 servings for my Certain Little Someone out of one avocado (your baby will take more or less, depending on their age or appetite), so that’s .50/serving. So, for me, it costs the same as what I would pay for a baby food jar, and like I said, I’ve never seen avocado in a jar, so it expands his repertoire of food.

It’s very HEALTHY, even for adults. Sometimes avocado gets a bad rap because it’s so fatty, but it’s full of healthy fats that your bodies need. Babies especially need a lot of fat (that’s why it’s a major component of breast milk!), so it’s a particularly useful inclusion in their diet. Avocado also has potassium, calcium, vitamin C and K, folic acid, copper, and dietary fibers, all healthy nutrients your little one needs.

I like to slice off and use the ends first, because the peel forms a nice little bowl. All I have to do is get a baby spoon and scoop out the fatty goodness.

Look at him, ready for the next bite!