Keepin' it Simple. Keepin' it Real

Do you follow me on Instagram? Well, why not?! You are missing out, my friend! Because if you had followed me on Instagram, then you would have known that I picked up an AWESOME cookbook while I was in Michigan last Christmas, and that I proceeded to bake some AWESOME deliciousness from it.
See this picture here? It was on Instagram. Live. In the moment. My excitement was almost palpable!
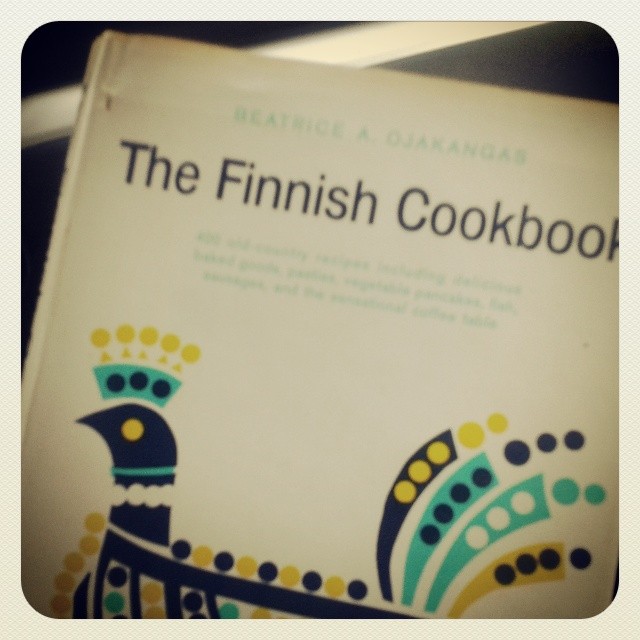
Well, at any rate, I was excited so I had to share with everybody on Instagram. And as I bake things from the book, I’m going to continue sharing on Instagram, so if you wanna keep up with me as I go around #BakingMyHeritage, then follow me on Instagram.
But first, check out this cake. (It’s from the book.)
 It’s AWESOME. Easy, delicious… and Finnish. Say what??
Head on over to Baking Whole Grains to get the full scoop.
 Although you know that healthy teeth have more to do with diet than oral hygiene, you still want to keep them clean, yes? (Ain’t nobody wants to catch wind of stinky breath, ya know?) And cleaning said teeth with toothpastes laden with nasty chemicals seems counter-productive, yes?
But natural toothpaste is so expensive, yes?
No.
Thankfully, affordable yet natural (even fluoride-free!) toothpaste is available at just about every grocery store, as well as the ubiquitous Walmart and Target. I’m talking about Tom’s of Maine, whose line of kids’ toothpastes I was recently able to try.
 What I Like About Tom’s of Maine
Honestly, there’s not a lot I don’t like about Tom’s of Maine, although some of their ingredients (sodium lauryl sulfate) are not *quite* as natural and unprocessed as I would prefer. However, the alternatives are a lot pricier and extremely difficult to find, which makes Toms of Maine an excellent choice.
 Lately, I’ve gotten seriously fed up with having to repeat my kids’ names , each repetition rising in volume until the entire neighborhood (probably the entire city) could hear my roar. I’ve gotten fed up with my kids for not responding like they know they should… and I’ve gotten fed up with myself for allowing this to continue. That’s just some straight up bad parenting right there.
As I considered how to go about remedying this situation I found myself in, I remembered some advice our pastor had given a few months back about training your children in obedience and respect: He recommended training your children before the need arises. As it applies to this particular problem, that means training them to respond to your call in the way you want them to before you actually try calling their name. In other words, don’t try to train them to respond politely and respectfully when you’re irritated in the heat of the moment. Nope. That’s just more bad parenting. To really train them well, you have to train them before the fact, not after.
I contemplated how to go about this for a while before it hit me: Turn it into a game! Kids love games, right? And usually, the simpler the better. The game I came up with is definitely simple, but it is amazing how much fun The Boys have playing it!

photo credit: sideshowmom
I call it the “Yes Ma’am! Game” and it goes like this:
Told ya. Simple!

The Boys!
To be honest, when I first started this whole game, I wasn’t sure how it would all play out; but I figured anything was better than hollering their name at the top of my lungs, so I just dove in and did it with gusto.
It played out much better than I expected! Here’s how it all went down:
I plan to keep this game up until we’ve got it down pat and the “Yes Ma’am” answer is automatic every time, and then I’ll resurrect it as I need to when the habit slips.

photo credit: sgarton
No guarantees, friend, but here are a few tips to at least give it a fighting chance:
 Got some leftover meat and no idea what to do with it? I’ve got an idea for you! No more boring casseroles or lame pasta dishes: Here’s some creative fun you can have that will turn your hunk of “meh” into “YUM!”.
This is probably one of my favorite leftover options. Literally any kind of meat - and it doesn’t have to be Asian-flavored - can be rolled up in a rice paper wrapper, fried or baked, and served with a dip. Certainly you can make them Asian flavors if you want, but why not go with Mexican or BBQ, if that’s what you’ve got? Mexican spring rolls can be served with salsa, and BBQ spring rolls with (what else?) barbecue sauce.
If you’ve never played with spring roll wrappers before, here’s my super brief tutorial:
I’m totally serious, by the way, that just about any thing can be wrapped up in a spring roll! Don’t feel like you need a special recipe or anything: if you’ve got shredded BBQ meat, for example, just plop some of it on the wrapper, top it with a sprinkle of cheese (or maybe some cole slaw?), wrap it up and cook it!
Again with the Asian influence, but seriously. Stir fry is the way to go! Especially if you also have leftover veggies - even better!
Once again, you don’t have to worry about sticking to an Asian flavor of some kind, although practically any cooked meat can morph into Asian cuisine via stir fry. Just follow this great tutorial from AllRecipes.com , keeping in mind that pre-cooked meats and veggies will not need nearly as much time as is prescribed in the article.
A stir fry is also great because it can also utilize any leftover starch (noodles or rice, for example) that you may have. Get rid of those leftovers in one fell swoop!
 3. Sandwiches
Now, I’m not talking about a boring ol’ meatloaf sandwich with a hunk of nasty cold meatloaf shoved between two slices of plain ol’ bread. No way. Not how I roll.
What I’m talking about is creativity, and it starts with the bread. If you want your leftover sandwich to appeal to the masses (i.e. your starving leftover-hating family), it’s going to have to have some charm to it. Thankfully, the possibilities are practically endless:
You get the idea. Now top it with some fancy (or not so fancy) cheese, a little bit of sauce and maybe some crunchy shredded veggies for good measure, and you’ve got some gourmet leftovers goin’ on!
 4. Pizza
Everybody knows that everybody hates leftovers, right? BUT! Everybody loves pizza, right? So there ya go. Turn the leftovers into pizza and everybody’s happy.
And it’s so easy, too! Pizza crust is a yeast bread, but it doesn’t require all that bothersome kneading and rising stuff, so even a novice can manage it. I usually make either my Spelt Pizza Crust or my Honey Whole Wheat Pizza Crust, but you can make any kind of pizza crust you desire.
Then top it with a sauce of some kind, and it most certainly does not have to be pizza sauce. (I guess technically it doesn’t even need sauce… but it’s nice if you have it.) If you have a sauce that went with the meat when you first ate it, then that’s perfect! Whatever it is, it will work. If not, try Ranch dressing, or BBQ sauce, or a basic white sauce or cheese sauce.
Next, slice or shred the meat and sprinkle it over the sauce. Top with veggies and cheese like you would any pizza, and bake as usual. No complaints on leftover night!
 5. Salad
Here you have two options. You can go with a green salad or a starch salad, and you can get as creative as you want with either one.
Personally, a green salad seems kind of like a boring option, so since we’re looking at creative ideas here, let’s talk about the “starch salad”. I say “starch salad” because you can use just about any kind of starch as the main component:
Cook the starch as you normally wood, then add your meat and whatever vegetables you like. To finish off your leftover magic, whip up a simple vinaigrette to bring it all together. My “Not Your Grandma’s” Ham & Pasta Salad is a great example that can get you started.
There you go, friend! Five fun ideas for leftover meat that will please your palate and your hungry family. Here’s to NO WASTE!

Mmmm ain’t it gorgeous?! And being the terrible photographer that I am, trust me, the real thing was a little prettier. There’s something about the vibrant color of cranberries that just begs me to use them up this time of year. When everything else is drab and dreary, that brilliant splash of color is refreshingly beautiful.
Oh, and it tastes pretty good, too! The tart flavor of the cranberries matches particularly well with a sweet dessert, as I have discovered after multiple experimentations with that particular combination this winter. Yummy!
Today, I’m over at Baking Whole Grains with a delicious whole-food-ized recipe for Upside Down Cranberry Cake. Click here for the recipe!
PS. It calls for spelt, but wheat flour will work just as well. Just use about 1/4 cup less.
 This year I accidentally took my own advice and sent New Year’s cards instead of Christmas cards. (OK, to be perfectly transparent… I haven’t actually sent anything yet. It’s on my to-do list!) I say “accidentally” because I actually wrote the blamed thing back in December, but then never had a chance to print it out, sign and address the cards, and get it in the mail. Henceforth and therefore, it is now a “New Year’s” card/letter.
Here’s the blogified version. It’s worth a read, if I do say so myself.
“The Lord gave, and the Lord hath taken away; blessed be the name of the Lord.” Job 1:21
What if the greatest blessing is not found in the gift that is given, but in the gift that is taken away?
Consider for a moment: the arrival of our Lord and Savior Jesus Christ was a Gift that prompted the glorious praise of men and angels alike, and continues to be marked in celebration annually centuries later. Yet those who witnessed the coming of this precious Gift were stunned and dismayed when He was seemingly snatched from them before their eyes just a few decades later, apparently without having even fulfilled His purpose on earth. {Or so it seemed to them at first.}
God moves in a mysterious way His wonders to perform, and often, His greatest blessings come not when the gift is given… but when it is taken away.
My DH and I have experienced this firsthand! In March of last year, God gave us what we had been asking for a long time: a better job for my DH, with significantly higher salary, and a security clearance to boot! His direction in our lives was quite clear, and we moved excitedly – and with a little trepidation – to Northern Virginia, after having spent our entire married life thus far in Maryland.
Barely two months later, through no fault of his own, my DH lost his new job. We spent very little time wondering if we had misread the signs leading us to Virginia because God quickly strengthened the conviction in our hearts that He had given us this job for the express purpose of taking it away.
Doesn’t make sense? The mysterious ways of God do not make sense to our human mind, but both Jonathan and I can honestly say, “The Lord gave, and the Lord hath taken away. Blessed be the name of the Lord.” We cannot explain to you the joy and the peace that flooded our hearts after the initial shock wore off. We have seen God work in our lives in an amazing way that would not have been possible otherwise. We have experienced God’s grace more personally and tangibly than we ever had previously in our lives, even though we both grew up in Christian homes surrounded by the teaching of the Word.
We are ever so grateful to God for His provision for us (not the least of which is Jonathan’s PT job and my job as a K3 teacher) and His love for us, and that He has not discarded us to live our lives as we wish, but continually draws us closer and closer to Him.
We know also, that just as Jesus – the Perfect Gift from Heaven – was not taken away from us forever {No, He is alive and well and will return in power and glory one day!), and therefore endured the suffering of death and the cross for the joy that was set before Him; so we can endure our temporary suffering here on earth, knowing He has a greater purpose to fulfill within us and through us. We look forward to being useful as clean vessels in His service, wherever that may be and whatever it requires of us.
Merry Christmas!
Happy New Year’s!
Uh… ya know… have a good life and stuff!
(Next Christmas, I promise I’ll be on time!)

Now that Christmas is over, I’m sure you have a plethora of Christmas cards you don’t really know what to do with. At least I know that’s what happens to me every year! The photograph ones I keep in a photo album, but the actual Christmas cards are not so easily dealt with: they’re so pretty, you hate to throw them away… but what can you do with them?
This year, I hit upon a creative solution: Every year at Christmas, I like to help my boys make some ornaments they can give as gifts to various family members. One year it was cinnamon ornaments, and another year they were made with salt dough. I feel like the whole process teaches them the joy of giving as well as the joy of creating, and family members (grandparents especially!) love to receive their little handmade treasures - a total win-win!
This past Christmas, I took on an ambitious project for their ornament gifts; and in the end, their role was minimal (probably shoulda waited ’til they were a little older), but I loved the final result anyway! What I particularly love about this project (which I originally found on Pinterest , of course) is that it is made of recycled materials. In particular, it makes use of Christmas cards, which are so beautiful… but so plentiful. You can only use them for gift tags so much, and then even that gets a little old, ya know? I was thrilled to find this unique and creative usage for all the Christmas cards I’d been hoarding in a little box.

This isn’t as simple of a craft as I usually undertake, and I actually did have to buy some items specifically for this project (never happens!), but I love the result. I might make some more next year and give them as gifts myself!

Summary: Upcycle your old Christmas cards into these beautiful ornaments.

 Besides the crazy extreme winter weather my family endured during our Christmas vacation to the Upper Peninsula of Michigan, we also endured a crazy extreme stomach bug. It started with my cute little niece and spread like wildfire from there to almost every member of my extended family (20 out of 31 people succumbed to the bug to one extent or another).
Thankfully, my sister and I had brought along our essential oils, which we used extensively, both on ourselves and our ailing family members. There were a few other great tips shared between the suffering and we all managed to enjoy our Christmas - and even the long drive back - in spite of it all.
I’m going to share the home remedies we found to be most effective throughout the ordeal, but first, a little poem my brother wrote for the occasion:
‘Twas the night before Christmas a little past ten and not a sound could be heard save the sound of us pukin
The buckets were lined on the floor with much care, in the hopes that projectiles would find their way there.
*snort*
And now that that’s out of the way, let’s move on to some helpful remedies we employed to get over this bug:

Peppermint oil ($21.50 from Young Living) is a classic oil for all kinds of stomach ailments, and can be used in several different ways to help with various digestive issues… even constipation!
My sister did a quick google search and found this great page full of advice for diarrhea and other tummy ailments. We used a variation of the recommended oil blend for diarrhea:
Put a drop or two of each oil in your hand, and then add about a teaspoon of carrier oil. Rub the mixture together between your palms and then massage your tummy with a circular motion.
My DH and I both applied this blend and neither one of us ever had any diarrhea (TMI, sorry), so it seemed to help. Two of my sisters also applied the blend, and the one never really got sick, but the other one did, so your mileage might vary. (I will mention, at the case of overloading on the TMI here, that most of the patients were suffering diarrhea on a lengthy road trip, but we had to make very few pit stops, and there were no accidents. *shew* I’m guessing this is due at least in part to the oils being spread around all the different tummies.)
Note: I highly recommend Young Living Essential Oils brand! They’re pricey, but anyone can purchase them at the wholesale price by becoming a distributor. You can become a YL distributor simply by purchasing one of their starter kits, which are as low as $40 (although, if you can swing it, the premium kit for $150 is a fantastic deal - it’s the one I started with, and it’s even better now because it comes with a diffuser!). To maintain distributor status, all you have to do is make a $50 purchase within the year. No obligation to sell or recruit or any of that stuff, just access to the 25% off wholesale price. You can sign up here on my Young Living site if you are interested.
My sister swears by this prevention tip: whenever someone in your family comes down with a tummy bug, start chugging grape juice. Get the purest, best juice you can find/afford, and drink away at it for as long as you can stand it. No idea why it works, but it really does seem to help (unfortunately, we didn’t have ready access to grape juice over Christmas, so we couldn’t fully test it this time around, but I’ve seen/heard it work in other situations).
My DH is one of very few people who was not even remotely touched by the illness (yet. I suppose there’s still time for that.) and I can’t help but think that it’s because he takes a very high dose of probiotics for his colitis. If your stomach can tolerate some good yogurt, that’s a great way to get probiotics in, but if you’re well into the throes of nauseous agony, it’s better to go with a probiotic of some sort. My two pregnant SIL’s both found that taking probiotics was what finally helped them to give this bug the boot, since it seemed to want to stick around them a little longer.
I’m talkin’ Saltines and Canada Dry here, people. I know, I know, it’s hardly whole foods, and it’s hardly nourishing, but it’s what I grew up on and it helps. It really does! I sipped ginger ale throughout my first trimester of both pregnancies, and it was one of very few things that helped keep the constant nausea at bay (that and peppermint candy). It also helps whenever I’m feeling a wee bit queasy from a stomach bug. When I’m recovering from a bout of stomach nastiness, crackers are a comforting food that manages to stay down, so I always reach for them first.
How do you fight the tummy bug?


