Copycat Panera Fuji Apple Chicken Salad

This post was originally published in June, 2009. Copycat Panera Apple Chicken Salad I haven’t blogged in a few days because we went up to Lancaster, PA to visit with some family and have a short mini-vacation. Vacations are always fun, but, especially when it’s such a short vacation, it’s sometimes hard to get back home and go back to the daily grind. So I decided to bring some of my vacation home with me.

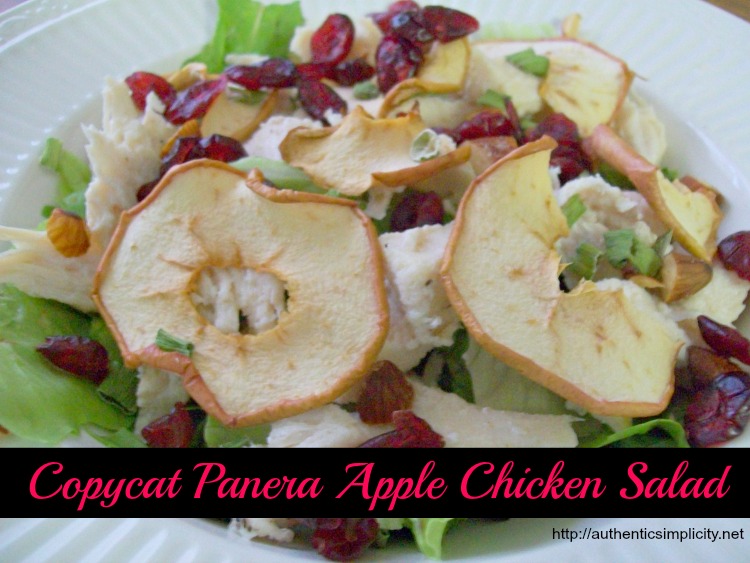
I decided to bring home with me some yummy food I ate while on vacation. Of course, I couldn’t actually bring back the food itself, since it would have gotten quite yucky waiting to be put in my fridge (ew!) so I just brought back the ideaof the food I enjoyed so I could recreate it at home.The first dish I enjoyed was the Fuji Apple Chicken Salad at Panera. What I like about their chicken salad is that the apples are dried, not fresh. Not your leathery, smushy kind of dried, but more like an apple chip dried. The combination of the sweet crunchy apple blended so perfectly with the other flavors in the salad, that it was super delicious!Unfortunately, the only dried apples I had on hand at home were the leathery, smushy variety which simply would not do for my purposes. So I set out to make myself some apple chips.

Copycat Panera Apple Chicken Salad

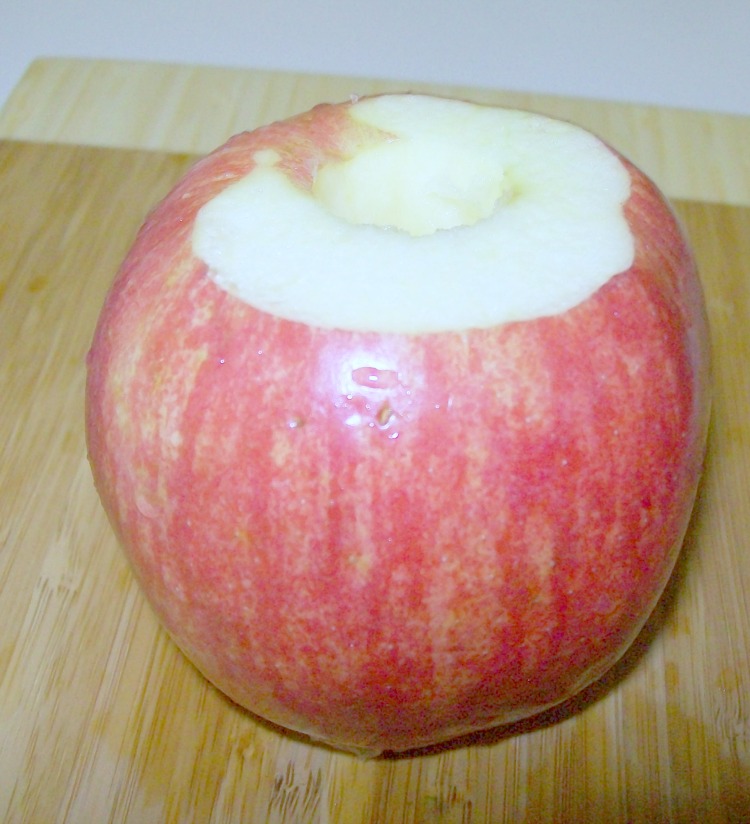
First, I cored an apple and sliced off the ends. I could have peeled it as well, but I opted to leave the peel on for color. Besides, the peel was left on in the Panera salad, and since I was attempting to recreate my vacation, I had to follow it as closely as possible.

Copycat Panera Apple Chicken Salad
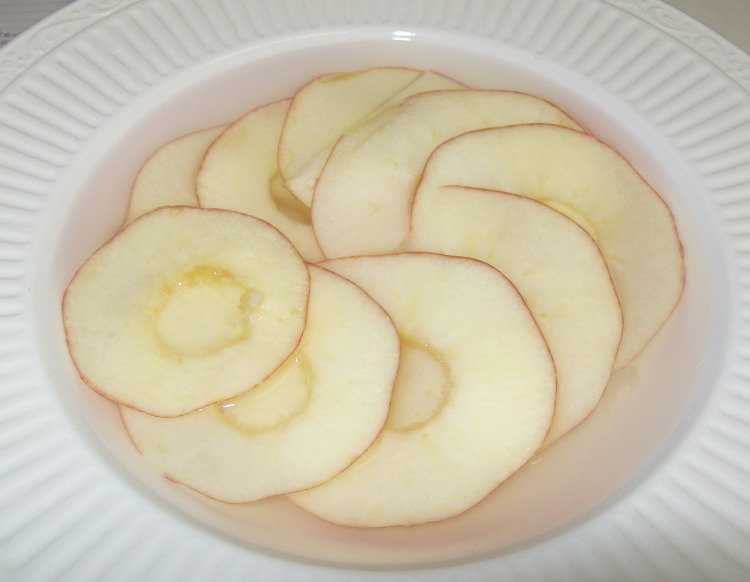
Then I sliced the apple into thin, even slices (unfortunately, some of them I sliced a little TOO thin) and soaked them in lemon water for a few minutes, to limit browning. This step is not necessary unless you want them to be as white as possible.

drying apple chips in oven
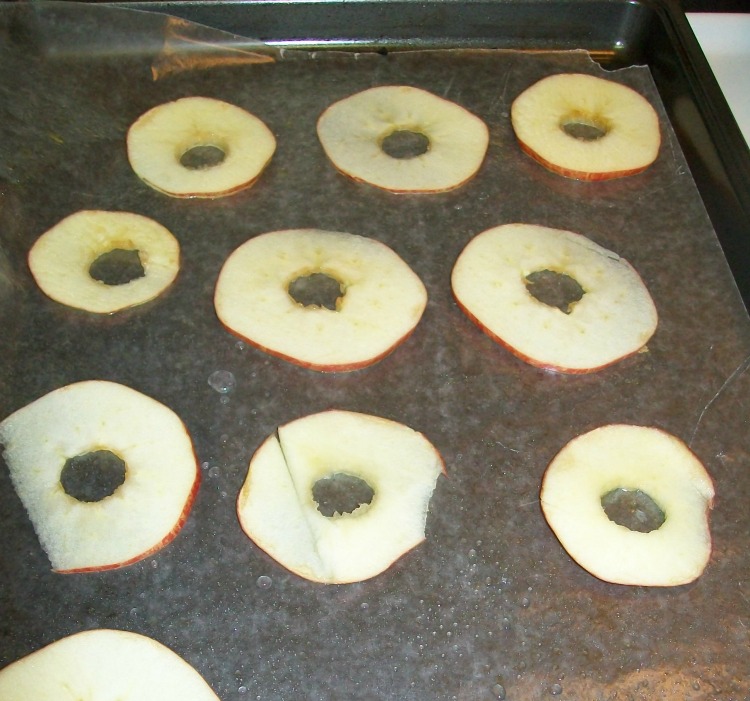
Then I lined a baking sheet with wax paper, greased the wax paper and laid the apple slices out in a single layer, with plenty of room between slices. I put this in my oven, on the lowest setting possible (which happens to be 200 on my cheap-o apartment oven) for about 45 minutes. It would have been better to use a lower setting for a longer period of time, but alas and alack, that was not possible for me!

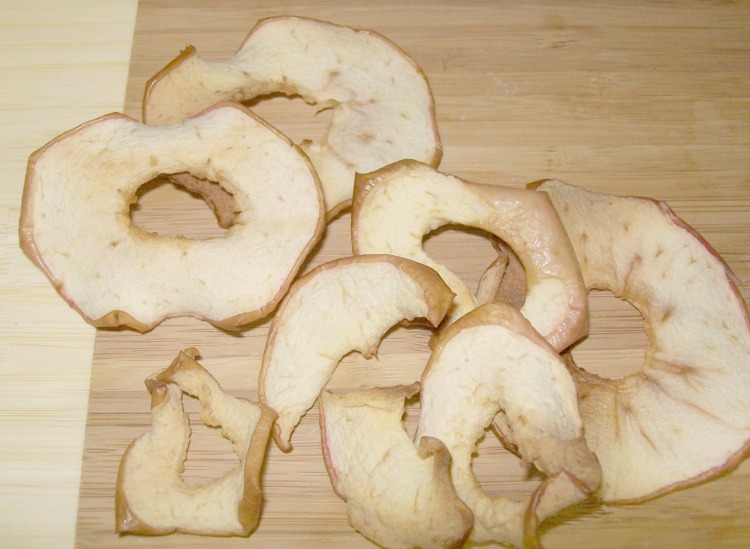
And here are the apple chips, ready to be put into my Apple Chicken Salad.

Copycat Panera Apple Chicken Salad

Sharing at Mommy Monday, Try a New Recipe Tuesday, and Tasty Tuesday

Crock Pot 5-Spice Chicken {at Stacy Makes Cents}


5 spice chicken Stacy Makes Cents is a blog I discovered last year, and love. Stacy is frugal (like me) and likes to eat healthy food (like me). I like Stacy! Her blog posts always make me smile, and sometimes laugh right out loud.

Today’s your chance to check out her blog, because yours truly is guest posting there with a delicious (if I do say so myself) recipe for 5-Spice Crock Pot Chicken. (Which, by the way, Stacy features crock pot recipes every Friday, another reason I love her!)

A few months back, I was at Ollie’s (a discount store kind of like Marshall’s or Ross but without the clothes and even messier) and stumbled across a little bottle of Spice Islands’ Chinese 5-Spice Powder. I don’t remember how much it was – maybe $1.99? – but I remember it was cheap. And I like cheap spices. So I bought it.

Problem was, I had absolutely no idea what to do with it! I had never before in my life made or even eaten anything (that I recall, anyway; I suppose there’s always the chance I ate it unaware) made with Chinese 5-spice powder. It was one of those random spice mixes that seemed non-essential to my life.

Until I saw it for $1.99.

Find out what I did with that 5-spice powder by reading my guest post at Stacy Makes Cents. Say Hi to Stacy for me!

Cast Party Wednesday realfoodallergyfree

Sizzlin’ Soups: Slow Cooker Chicken and Whole Wheat Garlic Dumplings

Welcome back to Sizzlin’ Soups! Day2Day Joys, Christian Mommy Blogger, The Humbled Homemaker, Intentional by Grace, The Purposed Heart and myself have had a lot of fun bringing you our favorite heart-warming soup recipes.

In case you missed them, we’ve already featured:

I’ve already tried the Creamy Chicken and Rice Soup (I made the wheat-free, dairy-free version), and my whole family loved it! These are recipes you will want to include in your regular meal-planning rotation, I promise you.
And we’re going to make it easy for you to do just that… we will have a free gift for you after our last installment that you will definitely want to take advantage of! Be sure to subscribe to one of the above blogs so that you don’t miss out on the announcement!
Now on to this week’s soup. It’s my turn, and I’ve had fun experimenting with Chicken & Dumplings in the crock pot. Can you believe, by the way, that I had never even eaten chicken and dumplings before? Not that I can recall, anyway. But it always sounded like such a delicious comfort food, and one I knew I would love.
And I was right! Delicious comfort food that I will definitely be making again and again. I started with this chicken and dumpling recipe at Goodbite.com, and modified it to make it easier and healthier. I don’t believe in sauteing things before I put them in the slow cooker, because that just adds extra work. I don’t do extra work. Keep it to the minimum! So this is simplified for anybody like me who doesn’t have time for extra steps. (I did make use of a stash of frozen cooked chicken - if you don’t have such a stash, you’ll probably want to saute your fresh chicken at least briefly before putting it in the pot.)
Speaking of saving steps, there is one thing about making soup that seems to take for.ev.er. and that is chopping up the ubiquitous celery and carrots that always end up in soup. I’ve recently discovered a trick that significantly reduces my chopping time and makes soup an even easier weeknight menu option. Here it is:
I am probably the last person in Christendom to have discovered this trick… but just in case, I’m sharing it with you. (So tell me, do you chop your veggies this way?)
Note: I used granulated garlic in the dumpling dough because I’m not a huge fan of fresh minced garlic in my baked goods. But if you prefer fresh garlic, you can just use the same amount (1-2 cloves) of fresh garlic in place of the granulated garlic.

This is not as QUICK as many slow cooker recipes, because there’s the added step (sorry, couldn’t eliminate that one) of making the dumpling dough. However, you can set the soup going in the morning, then make the dumplings about half an hour or so before dinner-time - that will still save you some dinner prep.
It is very EASY. The only thing to be aware of is not to add too much liquid to the dumpling dough, or you will have a mass of dough that never quite cooks through covering up a delicious pot of chicken soup. Not that I would know from experience or anything.
This is a good CHEAP dish. Soups are so good for using up odds and ends of meat and vegetables, and this is no exception. (If you have corn, peas, or green beans instead of the veggies I used, go ahead and throw ’em in the pot!) The dumplings take the place of the pasta typically found in a chicken noodle soup with very little extra cost.
I love my HEALTHY changes to this recipe, namely the use of whole wheat flour. You can use buttermilk in place of the yogurt (which is what the original recipe called for, and is just as healthy), but I usually have yogurt on hand, and I found it made the perfect substitute. These dumplings are SO much better for you than the typical canned biscuit recipe most people use. And I think they taste a lot better, too!

Cast Party Wednesday

Sizzlin’ Soups: Creamy Chicken and Rice Soup

Welcome back to Sizzlin’ Soups-a 6-week series sharing cozy, wholesome soup recipes! I have to admit, the weather in my neck of the woods has been more spring-like than wintery, inspiring thoughts of gardening and fresh salads more than soup. But according to Punxsatawney Phil, we have 6 more weeks of winter, so let’s not put away the soup pots yet!

So far, we’ve warmed up with

At the end of the 6-week series, we will have a surprise for you. *hint: it’s FREE* To be sure you don’t miss out, consider subscribing to any one of these participating blogs:

This week Erin at The Humbled Homemaker is bringing us her favorite soup recipe!
This soup can be classified as the comfort of all comfort foods: Creamy, frugal and filling, it’s the perfect addition to any cold winter night. Check out the recipe for this Creamy Chicken and Rice Soup over at The Humbled Homemaker!

Chicken Dip, Not from Buffalo

bbq chicken dip

I was actually going to call this dip “Chicken Chicken Dip“, the first “chicken” standing for the cowardly human variety, because it doesn’t have hot sauce in it. Due to sensitive tummies in my household, I never buy any because it would sit around in our fridge until it went bad (does it ever go bad?). Henceforth and therefore, we have never had Buffalo Chicken Dip, because, as you no doubt know, it has hot sauce. And we don’t eat hot sauce.

Instead, we have Non-Buffalo Chicken Dip, more specifically BBQ Chicken Dip, seeing as it’s made with BBQ sauce instead of hot sauce. It’s a milder-tasting, almost lightly sweet, version of the famous party dip, that goes just as perfectly with chunks of hearty bread, crudites, and tortilla chips. Hey, it even makes celery taste good!

I really think you should add this dip to your Super Bowl menu right now because your friends are gonna love it! If you want to be really cool, you can make a bread bowl shaped like a football. (I don’t know why I didn’t do that - I guess because I didn’t think of it until right this minute!)

One note: I wanted to try this recipe with yogurt cheese, since I’m embarking on my journey of make-your-own-dairy, but I ran out of milk and time, two essential qualities for that particular delicacy. So I bought a last-minute bar of cream cheese instead. I still want to try it with the yogurt cheese to see how it turns out; if you do, let me know! I really feel like cream cheese is just too over-processed for my taste, and would prefer the healthier version.

I did use my own homemade Ranch dressing and BBQ sauce for this recipe, which is easier if you already have some on hand, but not a huge problem if you don’t. They’re both easy to whip up in a jiffy! I’ve included the Ranch dressing in the recipe because I don’t have it anywhere else on the blog, but you can find my two favorite BBQ sauce recipes here: Quick BBQ Sauce, and Cooked BBQ Sauce.

bbq chicken dip


I served mine in a bread bowl(alas, not a football-shaped one). Of course, I used my artisan bread dough recipe, and I just baked it in a round shape in a small cast iron pan. I used up the last of my dough, so it ended up being kind of flat because I didn’t have enough - next time I will definitely use more, probably about a pound or pound and a half.

Since I made it with real ingredients (mostly, anyway), it was not quite as QUICK perhaps as regular Buffalo Chicken Dip. But I mixed up the dressings while the cream cheese was melting, so that didn’t really add much time. Still about half an hour or so from start to finish.

It’s very EASY, too. Again, the added steps of making the dressings, but nothing too overwhelming.

Cream cheese ain’t CHEAP, another reason why I wanted to use homemade yogurt cheese. Otherwise, it’s made with affordable, common ingredients that anyone can afford.

I like my HEALTHY-er version quite a bit! I love that I know each and every ingredient in this recipe - no packaged or bottled goods (with the exception of the cream cheese, which I hope to change in the future).

Linking with Tastetastic Thursday, Katherine Martinelli, and…

Cast Party Wednesday

Trying a New Technique: Cooking with “Bricks”

"Bricks"

”Eat
Don’t forget to enter your local food post in my Eat Local Eat Fresh carnival! Links will stay open throughout the month, so check back often for new updates!

Not bricks, exactly: I used two large cans of tomato sauce instead, but the finished product was (presumably) the same.

Have you ever heard of cooking with bricks before? I’d read about it here and there, and was curious about it, but never tried it until I came across this recipe in my Woman’s Day magazine. It looked surprisingly simple, as well as delightfully delicious (how’s that for annoying alliteration?!), so I was compelled to give it a try.

I am happy to report that it was both surprisingly simple and delightfully delicious. And if you’re curious, too, may I encourage you to go ahead and give it a try! It truly is so simple that anyone can do it (how do I know that? Because I did it, and if I can do it, anyone can!), and the results are amazing - crispy, juicy, yummy chicken!

You don’t need any special equipment either, not even bricks (although bricks are not exactly “special equipment”, and are cheap to boot!). All you need is a couple heavy canned goods and two large frying pans and you’re good to go.

The above recipe called for 8 cloves of garlic, but that was just a bit too much garlic for my taste, so I cut that amount in half. It also called for sprigs of fresh thyme, instead of the dried thyme I used, and I would have loved to use fresh thyme, but alas, I had none. I can’t wait to plant my herbs in my pots again!

The best part about the whole recipe was smashing the garlic. I had lots of fun using a meat hammer (like this one) to beat those garlic cloves into submission. Alas and alack, the joy was short-lived. It doesn’t take very long to smash garlic.
smashed garlic

And this is the gorgeous result!
Garlic Brick Chicken

This is a very QUICK weeknight dinner recipe - dinner ready in half an hour!

For being a “fancy” technique, cooking with “bricks” sure is EASY!

Chicken thighs are CHEAP-er than chicken breasts, and this makes them just as delicious!

If deep-frying chicken scares you because of all that oil and fat (it scares me but only because the oil usually used is vegetable oil, a no-no in my house), try this method for just as delicious but more HEALTHY results. Just a tablespoon of olive oil, and you have a great crispy skin on the chicken that rivals fried chicken in taste and texture.

Have a Cupcake: Birthday Celebration Main Dish {Cilantro Chicken Salad}

chicken salad with cilantro dressing

For my MIL and SIL’s birthday celebration, I wanted to have a menu that featured light, fresh foods that tasted like spring, whether or not the weather was cooperating. In fact, I really wanted to have a picnic, but the weather was definitely not cooperating with that dream!

Originally, my idea was to have chicken salad sandwiches, but when my batch of artisan bread dough uncharacteristically failed on me (or I failed it? one cannot exclude that possibility), I had to go to plan B. As often happens, plan B was even better than plan A and I should have just gone straight there in the first place.

This chicken salad actually surpassed all my expectations. I will admit I was a tiny bit apprehensive at the combination of ingredients (even though I was the one who came up with the combination, flinging things from the cupboard into the bowl with hardly a second thought), but my apprehensions were unfounded. After spending a day in the fridge getting to know one another better, those ingredients combined to create some pretty amazing results! Unfortunately, I meticulously wrote down every ingredient and the measurements I used on a scrap piece of paper… and in my efficiency, threw away said scrap piece of paper. *Sigh* This is my best approximation.

If you have leftover or cooked chicken, this is a super QUICK recipe, perfect for a spring or summer weeknight dinner or lunch. It’s also, as you can see, perfect for entertaining as well, and sure to please your guests.

Pouring vinaigrette from a bottle might perhaps be EASY-er… but you have to admit this is pretty easy!

Overall, it’s very CHEAP, although I did have to buy the limes expressly for this salad. I’ve found that Trader Joe’s has the best price for limes, although now that I say that I can’t remember exactly what the price is! {ahem}

Alot of chicken salads have gobs of mayonnaise, or worse, Miracle Whip, but not this one. Instead, it’s chock full of nutritious, wholesome and HEALTHY ingredients and provides a wide range of nutrients, including healthy fats, fiber, and vitamins like vitamin C.

Sharing at The Local Cook’s Salad Recipes Link-Up and…

Hearth and Soul Hop at Premeditated Leftovers

The Great Chicken Breast Adventure: Chicken Breasts with Orange Sauce

This is the third installment in my “The Great Chicken Breast Adventure” series.

To start at the beginning, read “Prepping the Chicken”.

So, the chicken is prepped, and the shreds were made into pocket sandwiches. Now you can see what I did with the actual chicken breasts!

Of the three bone-in breasts that I bought, I was able to divide 2 of them into 2 chicken breast portions each. Of those, one didn’t quite divide as evenly as I would have liked, so I lumped the smaller piece together with the two tenders I had cut, which left me with 4 chicken breast portions and a small pile of small chicken pieces.

I pan-fried it all when making this recipe, but only used the actual 4 breast pieces for the meal itself, and saved the small pieces for the last meal.

I clipped the original recipe from an All You magazine, and didn’t really change it much (surprise surprise!). It was very good as is, I only made some minor changes based on the ingredients I had at home . It really is a super easy recipe that is incredibly delicious. I love the fresh orange flavor in the sauce.

Panfrying is a great QUICK weeknight dinner method. If the meat is thawed and ready to go, the actual cooking part takes less than 15 minutes.

It’s also very EASY. Reducing a sauce sounds like quite the chef-y thing to do, but it’s really pretty simple.

This is pretty CHEAP, too, especially if you use homemade broth, and if you normally have orange juice in the fridge. I don’t always have orange juice on hand, so I probably wouldn’t buy it just for this recipe.

The orange juice and broth add some great nutrients to this recipe, making it a very HEALTHY choice.


Hearth and Soul Hop at the 21st Century Housewife

The Great Chicken Breast Adventure: Pocket Sandwiches

This is the second installment in my “The Great Chicken Breast Adventure” series.

To start at the beginning, read “Prepping the Chicken”.

Pocket sandwiches are not a new idea by any means; in fact, they go way back. You can find a variety of them in almost any culture: pasties from England, calzones from Italy, empanadas from Spain, pierogies from the Eastern block, and the list goes on and on and on. It seems that everybody needs a delicious portable food on occasion.

Mine are the purely American kind: you know, the kind that break all the rules and defy definition. The good ol’ American way! They follow the basic procedure of all the aforementioned - bread dough of some sort wrapped around a filling of some sort - but the type of bread and the type of filling don’t fit into any one category. So pocket sandwiches it is. If you can think of a better moniker, please let me know!

I used the shredded chicken I removed from the cooked chicken rib bones to make these chicken pocket sandwiches. Simply by changing the sauce and the cheese, you can create two very distinct tastes, as I will show you. I’m sure you can come up with a million different versions of your own once you have the basics down.

{Scroll down for a printable version of the recipe.}

To make your pocket sandwiches, you will need a pound of bread dough of some kind. Try the 5 Minute Artisan Bread, or a pizza dough. For Chicken Ranch Pockets, you will need ranch dressing , mozzarella cheese, and of course cooked chicken. Fresh parsley or other herbs are a delicious addition. For the Barbecue Chicken Pockets, you will need barbecue sauce, chicken, and cheddar or monterey jack cheese. In either case, a sprinkle of flour is also helpful to keep the cheese from disappearing into the bread, and additional seasonings or herbs are always tasty.

Here’s how to assemble and cook them:

Divide your pound of dough into 6 equal portions. Roll out each portion into a 5″ circle. Spread 1 TBSP of sauce on the circle, and place the chicken cheese and any other seasonings on one side of the circle.

Fold the other half of dough over, and seal the edges. You can crimp them like a pie crust or the like and leave it at that…

…or you can work the seam until it smooths and practically disappears, which is my preference. Place the pockets on a pizza stone or cast iron pan. Brush the tops with water, and then use a knife to slash a line through the top. Bake at 450F for about 10 minutes, until bottom crust is golden and cheese is melted.

Provided you have all the ingredients in place (i.e. bread dough at the ready, chicken cooked and cheese shredded), this is a very QUICK recipe. It was quick for me because I had the artisan bread dough in the fridge and had previously prepped the chicken. Shredding the cheese took only a couple minutes.

It’s certainly EASY! And it makes a great easy lunch: fix up a batch of these to store in the freezer for an easy lunch option.

It’s definitely CHEAPer than buying a similar item at the store in the freezer section. Save some moula and make it yourself!

It’s also a good HEALTHY option, even healthier if you add some vegetables like chopped green peppers or tomatoes, or even broccoli. I like to serve it with fresh fruit for a well-rounded meal.


The Great Chicken Breast Adventure:Prepping the Chicken

I was literally in awe when I read this post from JessieLeigh of Parenting the Tiniest of Miracles. Jaw-dropping awe, I tell you. She fed her family of 5 with just 5 bone-in chicken breasts that made 5 - yes, 5! - meals! Is your jaw dropping, too?

I realized I could learn something from her, and decided to challenge myself similarly. Lucky for me, split chicken breasts went on sale the very next week, so I picked up a package, eager to try and see if I could feed my family of 3 (because Baby Boy does not eat chicken breasts so he doesn’t count in this instance) 3 different meals with just 3 chicken breasts.

Come on, now, reach deep down inside and pull out your inner Bob the Builder: “Can she do it?” “Yes, she can!” Yessirree, Billy Bob, I made 3 different meals for my family with just 3 chicken breasts! Wanna see how? All this week, my posts will feature the Great Chicken Breast Adventure, detailing exactly what I did with those 3 chicken breasts.

First off, the prep. I am learning over and over that the biggest key to successfully having a “QECH” kitchen is a little advanced prep. Advanced prep usually takes only a portion of your time, but saves you oodles of time later when it counts. One great advantage is that you can choose when to do your prep, so you can maximize the time that you have.

You will need:

  • bone-in chicken breasts
  • a sharp knife
  • a cutting board
  • a large pot or stock pot
  • containers or bags for freezing

Prepping the chicken breasts didn’t take very long at all, and it was great to have the chicken ready-set-to-go in the freezer for quick weeknight meals. Here’s how I did it, per JessieLeigh’s instructions:

First, peel the skin off the breast, using a sharp knife to help where necessary. Keep the skins to help make a deliciously flavored broth later.

Next, slice the fatty meat portion off the bone with a sharp knife. Try to cut as close to the bone as possible, but don’t worry about perfection (unless you plan to serve the president. Or your mother-in-law.).

Place the bones with remaining bits of flesh into a large pot and cover with water. Bring to a boil and boil for 20-30 minutes or until cooked through. While they’re cooking, continue with the chicken breasts:

If any of the breasts are large enough, take advantage of their size and slice them in half to make 2 thinner chicken breast portions. This will stretch the meat even further!

Slice off the tenders. I only got two; I think I did something wrong!

The main portion of the meat is now ready. You can either cube the chicken breasts (or a portion of them) and tenders or freeze them as is, depending on your intended use. I froze them all whole because I wanted to cook them in their entirety later on.

Now back to the bones you set to boiling.

Remove them from the water (and don’t dump out the water!) and allow to cool until safe to handle. Using your fingers or a fork or knife, remove all the remaining now-cooked bits of chicken meat from the bones. I got about 1 1/2 cups. Use right away or freeze for a later meal.

Place the bones, the water from cooking the bones, and the skins from earlier into a slow cooker. Add more water if necessary to cover everything and cook on low for 8-10 hours or on high for 4 hours. (I like to do this overnight so I choose the low option.) You can also add vegetables (like carrots and celery) or even vegetable peels and ends. I also like to add some salt, whole black pepper, bay leaves, allspice berries and even some dried lemongrass for added flavor.

After it cooks in the slow cooker for a nice long while, strain and store your homemade broth in the fridge to use for yet another meal!

That’s right: not one piece of this baby goes to waste!

I never wanted to de-bone and de-skin my own chicken breasts before, thinking it was just to much work, but then I read JessieLeigh’s post and changed my mind. It’s really very QUICK and doesn’t take much time at all.

I was also leery of the whole procedure, thinking that it required some knowledge of butchery. Nope. EASY as it comes!

It is no secret that bone-in, skin-on chicken breasts are a LOT CHEAPer than the bone-less, skin-less variety. Now you know what to do with them! Maximize the money you spend on them by using the skin and bones to make a savory broth.

And it’s so much HEALTHY-er to do your own prep instead of relying on pre-prepped packaging, because that usually requires some sort of stabilizer or preservative and flavoring or even coloring. And making your own broth is such an easy thing to do that adds so much nutritional benefit to your diet.

So what did I make with the chicken?

Barbecue Chicken Pocket Sandwiches

Chicken with Orange Sauce

Double (Triple?) Cheese Chicken Pizza with Broccoli


Find more frugal recipes at: Frugal Food Thursdays.