Archives for October 2009

Pumpkins, Pumpkins, Everywhere!

The pumpkin crop is great this year! Some falls, pie pumpkins are hard to find, but I’ve been able to get them for a great price on a regular basis since pumpkin season started this year. I love it!

I don’t think I’ve made the same pumpkin thing twice, either, which my DH would say is just par for the course for me! I love experimenting with new recipes and trying new things and I rarely make anything twice, pumpkin or no.

My latest pumpkin endeavor was pumpkin cake. We were invited to a bonfire and requested to bring a snack to share. I thought pumpkin bars/cake would be a great autumnal treat for the occasion and could be eaten without utensils if necessary. However, when I started looking for a recipe, I discovered that they all were basically the same, and they all called for 4 eggs, 2 cups of sugar, and 1 cup of oil. I didn’t want to use that many eggs in one shot since I only had a dozen on hand, you know how much I hate using so much sugar in a recipe (even dessert), and I try not to use more than 1/2 cup of oil in a recipe either, preferably less. In fact, I try to use something other than oil in a recipe if I can. Furthermore, pumpkin cake just has to have cream cheese frosting, but I did not have any powdered sugar on hand (plus, I’m more than a little leery of all that sugar, too), so I had to find a cream cheese frosting recipe that did not require powdered sugar.

So I made a few adjustments. Here you have it:

Pumpkin Cake, My Way
1 3/4 cups pumpkin puree
1/2 cup applesauce
1/2 cup oil
3 eggs
1/2 cup sugar
1/2 cup honey
1 cup flour
1 cup white whole wheat flour
2 tsp baking powder
1 tsp baking soda
2 tsp cinnamon
1/2 tsp salt
1/2 tsp ground ginger
1/4 tsp ground cloves

Preheat oven to 350F; grease a 9×13 pan.

Mix the wet ingredients together until well blended:


Whisk the dry ingredients together in a separate bowl (aren’t those warm rich browns so pretty?):
Add the dry ingredients to the wet ingredients and stir until blended:

Pour the batter into the prepared pan and bake for 25-30 minutes. Cool and frost.

You’ll find the cream cheese frosting recipe here at Allrecipes.com. I was delighted to find this recipe (after searching for quite some time… should have started at Allrecipes!!) because most other “non” powdered sugar versions of cream cheese frosting still called for 1/2 cup. I didn’t even have 1/2 a cup, so this recipe was exactly what I needed. I think I will use it from now on because it was easy to make and delicious. It definitely tastes like cream cheese, though, so only make it if you like that taste. Another warning: the instructions on the recipe make it sound difficult as far as mixing the ingredients for the proper amount of time. Don’t worry about that. It was simple. Just beat on high with your mixer until everything’s smooth, and you’re good.

So QUICK: pretty much as easy as a pan of brownies. In fact, you can enjoy the cake straight, without the frosting, for an even faster weeknight treat. Also, you can use canned pumpkin if you don’t have fresh.

Super EASY! I love 3-step cake recipes: mix the wet ingredients, mix the dry ingredients, mix them together. Nothing complicated.

As far as cakes go, I guess it could be considered CHEAP, especially with pie pumpkins so readily available this year. I reduced the eggs to 3 to help with the cheap factor, and using less sugar doesn’t hurt the budget either.

It’s HEALTHY-er than the original recipe, since I cut the sugar down by half and then substituted half of the remaining sugar with honey. Also, I always use turbinado sugar in my baking as it’s less refined than regular granulated sugar. (It’s now available at my local warehouse club store, and one bag lasts me the whole month, at least, depending on how much baking I do. Awesome!) I cut down the oil by half also, and used coconut oil instead of vegetable oil, as it has more nutritional value (not hard to do, considering vegetable oil has almost no nutritional benefits). Furthermore, any dessert based on a vegetable is healthy in my book!!

As it turned out, the bonfire was rained out, so I was all dressed up (not really) with a dessert and nowhere to go. Instead, we invited ourselves over to the in-laws and had fun playing games and eating dessert. Yum!

Another Hiding Place for Squash


I have mentioned before that squash is not my favorite thing. Not by a long shot. But I have been purposefully including it more and more into my diet, mostly for the sake of my DH, because it is one of few vegetables he can eat without any consequences. Neither one of us grew up eating a lot of squash, so we have to acclimate ourselves to it.

Hence, I am always looking for new ways to “hide” squash in a recipe; in other words, it’s there, but not very noticeable. We are actually getting to the place where we can tolerate, if not enjoy, squash in a variety of different dishes.

My latest experiment started with a recipe for stuffed acorn squash. I’ve actually been mulling over this recipe for several years now, but never actually made it, mostly because I knew my DH would balk at squash served in such a blatant manner! However, I knew that the filling of stuffed squash (rice, ground meat, spices, etc.) would be delicious, so I determined to find some way to fix it in an acceptable manner.

Enter… Turkey Rice Squash Casserole. Quite a long name for such a simple dish, but that’s what it is, so I can’t change it. It turned out to be pretty tasty, if I do say so myself, and we both enjoyed it.

Turkey Rice Squash Casserole
cooked “meat” from one acorn squash
1 lb ground turkey, browned
2 cups cooked rice
1/2 tsp ground sage
1/2 tsp salt
1/2 tsp freshly ground black pepper
1/2 cup Italian bread crumbs
2 TBSP butter, melted
1 TBSP grated Parmesan (optional)
Creamed Chicken Soup:
-2 TBSP butter
-2 TBSP flour
-2 cups chicken broth

In a lightly greased casserole dish, combine cooked squash, browned ground turkey, and cooked rice. Stir in sage, salt and pepper until well mixed.

Melt 2 TBSP of butter in a saucepan over medium heat. Whisk in flour until smooth, cook for about a minute. Slowly add in chicken broth, stirring gently (you can add another cup of chicken broth to make a creamier casserole). Cook and stir until slightly thickened, then remove from heat and add to the rice mixture in the casserole dish.

Combine the bread crumbs and melted butter and spread them evenly over the casserole. Cook at 375F for about 20 minutes. Remove from oven and top with Parmesan cheese, if desired.

If the main ingredients are prepped, it’s pretty QUICK. I like to make extras whenever I brown ground meat or cook rice, so that they are ready for another quick meal. Rice, in particular, takes a while to cook, so it’s great to have a stash in the freezer for when you need it. You can use frozen butternut squash in place of the acorn squash to save time, also. This is also a great use for leftover chicken or turkey!

It’s EASY, too. Just mix it all together and pop it in the oven. Casseroles are great like that!

CHEAP, yep. You can use whatever ground meat you find on sale; I just happened to use ground turkey because that’s what I had on hand. It doesn’t even have to be ground meat; you can use leftovers from cooked chicken or turkey, too. Use 1 or 2 cups shredded/cubed chicken or turkey. Rice is cheap, and this time of year, I can get squash for as little as $0.59/lb. Also, I keep heels of bread in the freezer to use whenever a recipe calls for bread crumbs, and that’s cheap! Practically free, actually.

It’s HEALTHY, if you use homemade ingredients like chicken broth and bread crumbs. Frozen squash is OK, but pre-cooked or instant rice almost always has minimal nutritional value. In fact, it’s best to use brown rice, for the most nutritional value. I used to use store-bought creamed soups for casseroles until I realized how easy (And cheap. And healthy!) it was to make my own, but if you use a store-bought can of creamed soup, the health factor will go way down.

What’s for Dinner? Breakfast!

The funny thing about breakfast food is that most of it is way too complicated for morning-brain. Yogurt, smoothies, granola, cold cereal, sometimes hot oatmeal or the occasional scrambled egg… now those things I can handle in my before-coffee fog. And they can be made quickly enough to quiet my grumbling tummy. But pancakes, french toast, waffles, omelets, frittatas… not so much. Hence, I usually eat breakfast for dinner, at least once a week.

One of my favorite breakfasts-for-dinner is French Toast. A quick search on Wikipedia reveals that French toast, surprisingly, is not French at all. It first appeared in ancient Rome, in fact, and appears to have been common throughout Medieval Europe. It was originally known in English-speaking countries as “German Toast” but after World War I, anti-German sentiment caused the name to be changed to French Toast. (Don’t worry, Germans. Later on, the French fell out of favor, and we briefly called it Freedom Toast. We’re fickle like that.)

It’s not surprising that French toast is common in many countries and eras of history: it’s a wonderful way to use up stale bread, AND it’s a good combination of carbs and protein. Of course, we ruin all that goodness by dousing it in sugary syrup, but that’s another story for another day.

French toast is one of those things that I’ve always just made the way my mom did, and I don’t use measurements. Here’s a rough idea for one serving and you can adjust it as necessary for more.

Roman-German-French Toast
2 slices firm, dry bread
1 egg, beaten lightly
1-2 TBSP milk
dash of vanilla

Mix the egg, milk and vanilla together. Soak the bread in the egg/milk mixture until it has thoroughly seeped in. Fry the toast over medium heat on a well-oiled frying pan or griddle. Serve hot with whatever toppings you desire.

Ah, toppings. Now that’s the fun part. Here are some ideas, in order from healthiest to most decadent:

1. Honey

2. Maple Syrup

3. Fresh Fruit with Lightly Sweetened Whipped Cream

4. Sauted Fruit with Lightly Sweetened Whipped Cream (Use fresh or frozen fruit: add more oil or butter to the same frying pan you fried the toast in. Saute the fruit, stirring with a spatula, until it’s warmed through. You can sprinkle some sugar on it while sauteing it to add a caramel-y effect.)

5. Fruit Syrup or Sauce (Place desired amount of fruit in a saucepan; add juice or water. Bring to a boil, then simmer until fruit is soft enough to easily crush. To make a really thin syrup or sauce, you can run it through a blender; otherwise, just crush with a spoon or fork.)

6. Peanut Butter

7. Apple Spice Syrup (I love this recipe because it has very little sugar: the juice/cider sweetens it enough that it doesn’t need much sugar.)

8. Cinnamon Syrup (a lot of sugar, but still less than other recipes, and no corn syrup either. It uses flour to thicken the syrup.)

9. Homemade Maple Syrup (Lots of sugar, but still better for you than store-bought syrup. Quick and easy, too.)

10. Cinnamon Cream Syrup (Turns dinner into dessert. Wow, it’s good! You can use whole milk or whipping cream in place of the evaporated milk.)

French Toast may not be quick for breakfast, but it sure makes a QUICK dinner.

I’m no French chef, but I find French Toast to be quite EASY to make. It’s easy enough for a non-cooking bachelor (and that’s easy!)

Since it utilizes stale bread that would otherwise be trashed or fed to the birds, it’s a good CHEAP recipe. And if you don’t eat all the French Toast at dinner, you can use the extra slices to make peanut butter/banana sandwiches for breakfast the next day.

HEALTHY depends on the bread and the topping that you choose. Obviously, the more whole grain in the bread, the better it is. I’ve already detailed the healthiest choices for toppings. If you serve it with fresh fruit and a healthy protein such as yogurt or cottage cheese, you have a well-rounded meal.

Equal Parts Casserole, Sauce, Pot Pie… and Delicious!


Some recipes defy categorization, and this is one of them. I started with a Turkey a la King recipe, mixed it up with my mom’s chicken and biscuit casserole recipe, and ended up with something my DH called a “pot pie”. Whatever you want to call it… it’s delicious! And it’s the perfect meal for a rainy autumn day like we’ve been having here the past few days.

Turkey a la King/a la Casserole/a la Pot Pie
6 biscuits, uncooked (recipe follows)
1/4 cup butter, cubed
1/2 cup flour
1 cup chicken broth
1 cup milk
2 cups cubed cooked turkey (chicken will work just as well)
2 cups vegetables (I used carrots and peas)
1/2 tsp salt
1/4 tsp pepper
1/2 tsp ground sage
1 tsp parsley

In a large saucepan, melt the butter and stir in the flour until smooth. Gradually add the broth and milk, stirring until well blended. Bring to a boil; cook and stir for 1-2 minutes or until thickened. Add turkey, vegetables (If the vegetables are frozen, you can just mix them right in, but if they are fresh, I like to steam them in my microwave steamer for a few minutes to soften them up a bit) and seasonings. Pour mixture into large casserole dish and top with biscuits. Bake at 375 for 10-15 minutes, until biscuits are cooked through and mixture is bubbly.

Now for the biscuit recipe… this recipe is near and dear to my heart because it is the biscuit recipe my mom always used because it’s the biscuit recipe her mom always used. I (gasp) changed it up a little for this recipe, because I needed to use up some pumpkin and I thought it would add a nice festive autumnal touch to the meal! I also halved the recipe, because, well, my mom’s recipes are large enough to feed several crowds. Even halving the recipe leaves you with double the number of biscuits you need, so feel free to halve again!

Pumpkin Biscuits
1 cup flour
1 cup whole wheat flour
1/4 cup sugar
1/2 tsp salt
1 1/2 tsp baking powder
1/4 cup coconut oil or non-hydrogenated shortening or butter
1/2 cup sour milk (sour milk by adding a dash or two of lemon juice)
1/2 cup mashed pumpkin (or squash)

Mix the dry ingredients together:


Blend in the oil/shortening/butter with a pastry blender until crumbly:


Add in the milk (sometimes it’s better to start with a small amount and add as necessary, being careful not to over-mix):


When dough is not quite thoroughly mixed, add in the pumpkin:


Mix carefully until blended:


Turn over onto floured surface and knead lightly 10 times. Roll out to desired thickness (for the casserole, you’ll want them on the thinner side just so they cook a little more quickly, but I also like nice thick biscuits) and use a biscuit cutter to cut out biscuit shapes. Place on baking stone or greased baking sheet and bake for 10-12 minutes at 400F,

OR

for the Turkey a la King recipe, place 6 biscuits on top of the turkey mixture and cook as directed above.

This is QUICK for a nice weeknight meal. The mixture only takes a few minutes to cook on the stove-top and then the 15 minutes in the oven. Making the biscuits adds a few extra minutes, but you can do that up to a day ahead of time and keep some raw biscuits in the fridge. I made my biscuit dough in the morning so the biscuits were ready to go on top of the casserole in the evening.

Very EASY, also. Granted, it would be easier (and quicker) to buy a can of refrigerated biscuits, but then that would be very UN-healthy and totally not worth the extra few minutes you would save.

And of course, if you make your own biscuits, it’s a very CHEAP recipe. Leftover turkey goes a long way when stretched in a casserole like this, and if you use your own chicken broth, the main expense is your vegetables and the milk. You can use some powdered milk to cut down on the cost even further.

HEALTHY, yes, if you use homemade ingredients. Canned biscuits, canned broth and canned vegetables (or even bouillion cube) would considerably de-value the nutritional content, and would add a lot of unnecessary sodium.

A Little Early for Turkey, but….

… turkey breast was on sale and I couldn’t resist! Anyway, who says turkey is just for Thanksgiving? Not me. If it’s on sale, it’s in season!

I’ve only ever used one recipe for turkey breast, which is quite unusual for me because I rarely make the same thing twice. Although I guess I haven’t technically made it the same way more than twice, because the recipe I use is a nice basic recipe that I can get creative with!

Regular readers will not be surprised when I tell you I use the crock pot to cook the turkey breast. Me and my crock pot! I found this recipe in one of my favorite crockpot cookbooks: Fix it and Forget It.

On with the recipe…


QUICK? Yes! Just throw the ingredients in the crock pot and let it go. I had some mashed potatoes left over from the Shepherd’s Pie I made the other day (if you remember, I made some extra mashed potatoes just so I could use them in another meal), so all I had to do was heat them up, whip up some gravy and an autumn fruit salad (I used pear and apple for the fruits), and dinner was ready.

Can’t get any EASY-er than that! No mixing, no precise measurements. The hardest part was opening the package that sealed the turkey breast!

It was CHEAP because it was on sale for $0.79/lb, which made it less than $5 for the whole turkey breast. We’ll get at least 3 meals out of it, so $1.60-ish for the main dish at each of those meals? Great deal.

And HEALTHY, yes. Besides the famous tryptophan, turkey boasts many beneficial nutrients, including niacin, zinc, and vitamins B6 and B12. Compared to other meats, it is low in calories while remaining high in protein, so if you’re trying to lose or maintain weight, it’s an ideal choice.

Now my only question is, What do I do with the leftovers? Any ideas?


Find more great main dish recipes, perfect for the holidays, at:

Speechless. Literally.

So I caught this strange cold that is residing in my throat, rendering me more or less speechless, making my throat hurt and forcing out strange little random coughs that come out of the blue. No congestion, no headache, no sneezing or other common symptoms of a cold, just a sore throat, a cough and laryngitis. Weird.

So I’m currently lingering over a cup of lemon tea, sweetened with honey. Ahhhh…. I feel better already!

Actually, hot tea with lemon and honey is a time-tested cold remedy. Why?

~ Drinking hot liquids relieves nasal congestion and soothes the membranes in your throat and nose.
~ Drinking non-caffeinated beverages of any kind keeps you hydrated and helps break up any congestion.
~ The acidity of lemon juice kills bacteria in your throat.
~ Honey is soothing to your throat and is anti-microbial as well.
~ Inhaling the steam also reduces congestion.

Some people skip the tea and just swallow lemon juice and honey together. If you can stomach that, go for it, but I prefer to enjoy a little lemon juice and honey with my tea, not the other way around!

Since cold and flu season seems to be well under way now, here are a few time-tested cold remedies that have worked for me (AND, of course, are QUICK, EASY, CHEAP and undoubtedly HEALTHY). Don’t reach for that OTC medicine: even the Mayo Clinic agrees it won’t do you any good and may actually be harmful. Whatever you do, don’t keep popping those cough drops: they’re a proven waste of money as they merely soothe the throat and do not keep you from coughing. Instead, try some (or all) of the following home remedies:

~ Gargle salt water. Add about a teaspoon of salt to a cup of warm water. The salt helps kill the bacteria in your throat and the warm water is soothing.

~Inhale steam. The easiest way is to use a humidifier, but you can get an even more intense treatment by heating a kettle of water and pouring it into a bowl. Hold a towel over your head and lean over the bowl, inhaling the steam (careful that it’s not too hot!). I often like to add a drop or two of Vick’s vapor rub in there - wow it really opens up your airways!!

~ Saline rinse. Very common in India, a saline rinse basically involves squirting some salt water (less salt than you would use when gargling) up your nose. This has always been an effective treatment for me; probably, in fact, the most effective home remedy I’ve tried.

~ Take a zinc supplement or a product such as ColdEeze. Studies show conflicting evidence as to whether or not zinc is truly effective in fighting colds, but my own personal experience is that it works.

What is your favorite cold remedy?

Waste Not, Want Not

It’s pretty popular these days to be frugal, and some of our grandparents or even great-grandparents’ frugal ways are coming back into vogue. For some of us, this is nothing new: this is how we lived before the housing market crashed and the big car makers went bust! Nothing like a low balance in your bank account to make you figure out how to reduce, re-use and recycle what you have instead of buying something new.

I’ve mentioned before that I love buying pie pumpkins every fall. It’s almost like a ritual for me that ushers in the autumn season, and it wouldn’t be autumn if I didn’t cook up some pumpkin! But to be honest, the can of pumpkin at the grocery store costs the same or less for roughly the same amount of pumpkin, so I can’t say that I save myself any money. Unless! I also roast the pumpkin seeds, and there, my friends, is where the savings come in. A one-serving bag of pumpkin seeds costs about $1 at the grocery store, and I usually get about four servings of pumpkin seeds out of each pumpkin: a savings of $4. (One of these days, I’m going to have a huge vegetable garden and I’m going to grow my own pumpkins, and then I will be saving money, seeds or not!)

So whatever you do, if you buy a pie pumpkin and bake it, don’t throw away the seeds!

Instead, do this:

Un-Wasted Pumpkin Seeds
1 cup pumpkin seeds
1TBSP olive oil
salt and pepper to taste

Remove all the stringy stuff from the seeds (I find this is easier to do if I let it sit out and dry up just a bit) and rinse them. Lay them out in a single layer on a paper towel to dry. You can also soak them for a few hours in salt water, but I don’t always do that.

Once dry, add the oil and stir until all the seeds are evenly coated:


Sprinkle in the salt and pepper to taste:


Stir until evenly coated and then spread in an even layer on a cookie sheet. Roast at 250F, stirring every 10 minutes, until the seeds are slightly browned and crispy:


I like mine to err on the side of too crispy: I’ve under-cooked them before and they ended up chewy, which was just not yummy at all. Store in a jar indefinitely.

You can get really crazy with this recipe. Try sweet (cinnamon, nutmeg, sugar, etc.), savory (garlic powder, Italian spices, etc.), or spicy (paprika, cumin, etc.) versions, adding in your favorite spices to taste. I’ve tried pretty much all the above, and I like them all, but I also like to have a stash of plain ole salt-n-pepper seeds that are more flexible.

My favorite thing to do is add them to salads for a little salty crunch and flavor. You can also add them to a trail mix, or just eat them plain! My friend sent me a recipe for Pumpkin Seed Pesto, which I really want to try, so keep an eye out for that!

This is not as QUICK as buying that bag in the checkout lane, but it’s far more rewarding. And better-tasting, too, in my opinion.

It’s certainly EASY, though. Anyone can do this! In fact, you can even heat your oven, then turn it off and place the pan of seeds in it overnight. Just don’t forget to remove the pan before you turn the oven on again. Yes, I speak from experience!

We’ve already established that it’s CHEAP.

Pumpkin seeds are incredibly HEALTHY, also. They are great sources of zinc, fiber, B vitamins, iron and magnesium; they are anti-inflammatory, and they help to keep cholesterol levels low.

The QECH way to Feed a Crowd

Check out Life as Mom for more frugal birthday ideas! 

I love hosting parties, but I don’t do it very often because… well, really the only reason is that it can get really expensive fast. Because you gotta eat! And if you have a party, well, everybody’s gotta eat! The hardest part for me about entertaining is figuring out how to feed a crowd on a budget without going crazy myself.

I mentioned in a recent post that I have discovered “make-your-own” meals. Depending on how fancy and complicated you get, a buffet like this can really cut down your entertaining costs. And the great thing is, there are so many types of meals that you can turn into “make-your-own”: tacos, baked potatoes, mini pizzas, etc. Besides being economical, it also provides your guests with something fun to do, AND it enables them to make their meal more or less the way they like it.

Chipotle Mexican Grill, one of my most favorite fast food restaurants, has this buffet idea down pat! If you’ve never been there, they operate kind of like Subway, in that they have a cafeteria-style counter where you instruct them which ingredients you want on your taco/burrito/fajita/salad, etc. I almost always order the Burrito Bowl, which is a burrito without the burrito. Make sense? You start with a bowl, and add rice, beans, meat, salsa, sour cream and guacamole if you wish. It. is. so. good. Seriously. I get cravings for that stuff!

In fact, it was the first thing I thought of when trying to come up with a menu for my Certain Little Someone’s first birthday party, mostly because it was one thing I could eat when I was nurisng him. Because of his allergies, my diet (and now his) was very limited and it was so wonderful to be able to eat something that I loved and not have to worry about a reaction. I just ordered it without the cheese and sour cream, and YUM YUM!

So for his party, I more or less re-created the Chipotle’s Burrito Bowl idea, with rice, beans, chicken, a variety of toppings and tortilla chips on the side.

QUICK… perhaps not so much. Quicker than the cake, I can tell you for sure! But not as quick as hot dogs, say, or spaghetti. Especially the beans, because I had to soak them the day before and then let them cook for quite some time.

But EASY, that’s for sure. I borrowed some slow cookers and they really made it easy, especially since I could cook them at home, transport them to the park where we had the party and keep the food warm for the duration. The hardest part was shredding the chicken breasts which seemed to take about half of forever, but really I think it took about 20 minutes.

About as CHEAP as feeding 40 people can be, I think. This is what I ended up using:

8 lbs chicken breasts
2 lbs rice
2 lbs beans
2 lbs salsa
2-3 lbs cheese
1 lb sour cream
2-3 lbs tomatoes
2.5 lbs tortilla chips

For side dishes, we had some sliced apples, which my mom had given me from her apple tree, served with coconut yogurt dip, and sliced watermelon which my mother-in-law graciously provided. For drinks, I served home-made iced tea, Sparkling Grapefruit Punch (grapefruit juice mixed with sparkling water!), Capri Sun drinks for the kids, and a couple bottles of store-brand soda. Since some of the food items were contributed by others, I only spent about $30 on the food that was eaten. (I did buy too much, which I often do!) If I had to buy everything, I probably would have spent, at the most, $50. Not bad for 40 people!

HEALTHY, too. In fact, the unhealthiest thing was probably the tortilla chips, which are totally unnecessary, just a nice addition. Most of the ingredients (chicken, rice, beans) were cooked with only some added spice for flavorings, so no sauces or convenience foods with questionable ingredients.

Cilantro Lime Chicken
8 lbs chicken breasts
4 limes, juiced
1/2 cup apple cider vinegar
salt
pepper
garlic or garlic powder
fresh or dried cilantro

A note about the ingredients: I used individually frozen chicken breasts, and they fit nicely in two crockpots. You can also use red wine vinegar instead of the apple cider vinegar. I pretty much just added the salt and pepper, garlic powder and cilantro a little at a time until I had achieved the taste I was looking for, so I have no idea how much I actually used. I would say at least 1/4 - 1/3 cup of fresh cilantro, and if you’re using dried, at least 1 TBSP.

Place the chicken breasts in the crock pot. Mix the lime juice, vinegar, some salt and pepper and garlic powder and cilantro together. Pour over chicken. Cook on high for 6 hours. After 4-5 hours, you should be able to shred the chicken: remove the breasts from the pot and use two forks to pull apart the chicken into shreds. Return the chicken to the pot and stir in additional seasonings as necessary.

Chipotle Copycat Rice
4 cups rice
10 cups water
2 limes, juiced
approx. 1/3 cup fresh cilantro

Place all ingredients in crock pot and cook on High for at least 4 hours. I actually ended up removing the rice from the crockpot and cooking it on the stovetop until it was mostly done, because the crockpot was taking too long.


Burrito Black Beans
2 lbs black beans, rinsed, soaked and drained
lots and lots of water, as much as your crock pot or pot will hold
2-3 bay leaves
ground cumin
cilantro
garlic powder
green onions
salt
pepper

Once again, the spices are to taste. Start with a small amount of each, and periodically taste and add more as necessary. Place all the ingredients in the crock pot and cook on high for 4-6 hours, until beans are tender.

A Birthday is No Place for “QECH


So my Certain Little Someone is turning one tomorrow, can you believe it?! He was born on a Friday last year (obviously) so all day today I have been remembering the labor and delivery… and believe it or not, the memories are quite pleasant! What a day that was!

So you know I like things to be quick and easy, cheap and healthy, right? So how exactly does one accomplish a “QECH” birthday? That’s easy: one doesn’t!!! A birthday is no time to skimp on time, effort, money (ok, as long as you don’t spend more than you have!)… or even sugar. Can you believe I said that? To be honest, I’m a little shocked myself at how much sugar is in this cake, but I am repeating to myself over and over, “It’s for his birthday, It’s for his birthday. And it’s his FIRST birthday. He won’t eat like this every day.” Please tell me my mantra is right!

Aside from the fact that I had no choice but to make his birthday cake, since any baker in town would look cross-eyed at me if I asked for a wheat-free, dairy-free, egg-free cake, I have always wanted to make my children’s birthday cakes because that’s what my mom did for us when we were little. Actually, I have a special status in my family: I was the very first one to have a non-homemade cake. Yup! Normally, my mom, frugal lady that she is, would make our birthday cakes herself and decorate them. But my third birthday happened to fall on the day after we moved across the country and for some reason my mom wasn’t really into baking and decorating a cake on that day. So, yes, I was the very first in my family to have a store-bought cake for my birthday, aren’t I special?!

Anyway, I digress… at some point, my mom stopped making fancy decorated cakes, but I love looking at the pictures of the cakes she made when we were little. I even remember her cake decorating kit, although by the time I was old enough to use it, she wasn’t really doing that anymore so I never learned.

Until recently! My friend does an awesome job of decorating cakes for birthdays, wedding and baby showers, so I asked her to give me a crash course in cake decorating. She graciously came over and helped me decorate a practice cake for my Certain Little Someone, and today I made the real thing on my own.

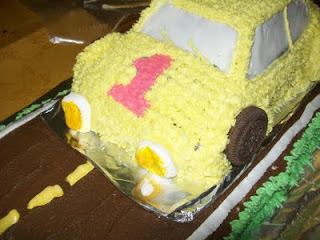
This cake is actually made of 3 cakes: 1 9×12, 1 8×8, and one car shaped cake on top. The rectangle and square form the “road” and are made with an “Eggless Chocolate Cake” recipe (one full and one half) I found in an old Fannie Farmer cookbook that I have. I picked it because it was a quick and easy recipe. Why aren’t you surprised?! The car cake is an allergy-friendly Wacky Cake. Wacky Cake is an awesome cake for food-allergic people because it has no dairy or egg in it. Depending on what you’re reading, it was developed either during the Depression or WWII when eggs and milk were scarce and/or expensive. So the only thing I had to substitute was the wheat flour, and thankfully, this recipe is so sturdy, it can handle a shake-up like that! Scroll down to the bottom to see the recipes.

The frosting is so terribly bad for you I can barely manage to speak about it, but for the sake of total openness and honesty, I will tell you that it is composed entirely of shortening, vanilla, lots and lots and lots of powdered sugar, and water. At least the shortening was non-hydrogenated. But I can’t use butter, and I was pretty sure the non-dairy margarines wouldn’t hold up well enough for a good strong buttercream frosting, so I went with the shortening. There. I told you. Whew!

Here you can see the cake in its entirety:


First I laid out the rectangular and square cakes and covered them with a crumb coat. (Should I tell you that I actually made another rectangular cake and it fell apart, so I was forced to make the square cake? Nah, I won’t tell you about that disaster.) For the sake of anyone who doesn’t know but wants to, a crumb coat is a thin layer of frosting that you allow to set so that you can then easily frost the cake without a layer of crumbs getting in the way. I haven’t tried it, but I have read that another option is to freeze the cake for a little while.

After the crumb coat was set, I used a knife to spread a portion of frosting colored with cocoa for the road. I went over that with a spatula to make it nice and smooth. At that point, I put the car cake (which I had on a separate cake board, both to make it easy to transfer but also to separate the allergy-free cake from the allergenic one) on top in the middle. I used a #103 tip to pipe the lines on the road, and a #233 tip to pipe the grass on the sides of the cake.


Once the road was done, I set to work on the car itself. Once again, I covered it with a crumb coat, then I added another layer of white on all the windows. Alternately, gray or black frosting could be used, but I went with the white because it was easier (surprised?).

I used a #3 tip to pipe an outline for the windows and doors. In retrospect, I probably should have used a bigger one, but it turned out OK. To make the numbers, I first outlined them in the crumb coat with a toothpick and then used the #3 tip to follow the outline and then fill it in. I used a #21 tip to pipe all the stars.


I cut two marshmallows in half, flattened them and painted them with yellow food coloring for the headlights. I attached chocolate cream cookies for the wheels and piped an extra layer of stars around them to make the wheel wells.

And that’s it! My super unhealthy cake! I can’t wait until my Certain Little Someone gets his hands on it and makes a big huge mess of it. Based on experience, I really don’t think he’s going to be the type to eat it daintily.


RECIPES:

Egg-Free, Dairy-Free, Wheat-Free Wacky Birthday Cake
1 cup rice flour
1 cup tapioca flour
2/3 cup arrowroot starch or corn starch
1/3 cup potato starch
2 tsp xantham gum
2 cups sugar
2 tsp baking soda
1 tsp salt
2 cups water
1/2 cup plus 2 TBSP oil (I used corn; I have used coconut in the past)
2 TBSP vinegar
1 1/2 tsp vanilla

Whisk the dry ingredients together in a large bowl. In a 4-cup measuring cup mix the liquid ingredients and add them to the dry ingredients. Stir until thoroughly combined. Pour into a pan that has been well-greased and floured and bake at 350 for 50-60 minutes.

*Note: I learned a few tricks to help this cake cook evenly in the shaped pan. First of all, I put an upside down flower nail into the middle of the cake to help distribute the heat evenly. Then I raised the oven rack one notch and turn the oven back to 325. After it had baked for about 50 minutes, I covered it with foil so that the top would not burn.

Easy Egg-Free Chocolate Cake
1 2/3 cup flour
1 cup sugar
1/2 cup cocoa
1 tsp baking soda
1/2 tsp salt
1 cup buttermilk (or milk soured with lemon juice or vinegar)
1/2 cup butter, melted
1 1/2 tsp vanilla

Whisk the dry ingredients together in a medium bowl. Add the liquid ingredients and mix well. Bake in a greased and floured pan at 375 for 30 minutes. This recipe will make one thin 9×12 cake or one thick 8×8.

Butter-Free Cream-Free Buttercream Frosting
1/2 cup non-hydrogenated shortening
1 tsp vanilla
approx. 5 cups powdered sugar
4-8 TBSP of water

Beat the shortening and vanilla together until creamy (this won’t take long!). Alternate the powdered sugar and water until you achieve the right consistency. You’ll need a firm but not stiff consistency in order to decorate with the bag and tips.

Once the frosting is to the preferred consistency, add in your chosen color. Use gel food coloring rather than liquid to maintain the consistency, and follow the directions on the package for achieving the desired color.

Interesting reads