Archives for January 2012

Chicken Dip, Not from Buffalo

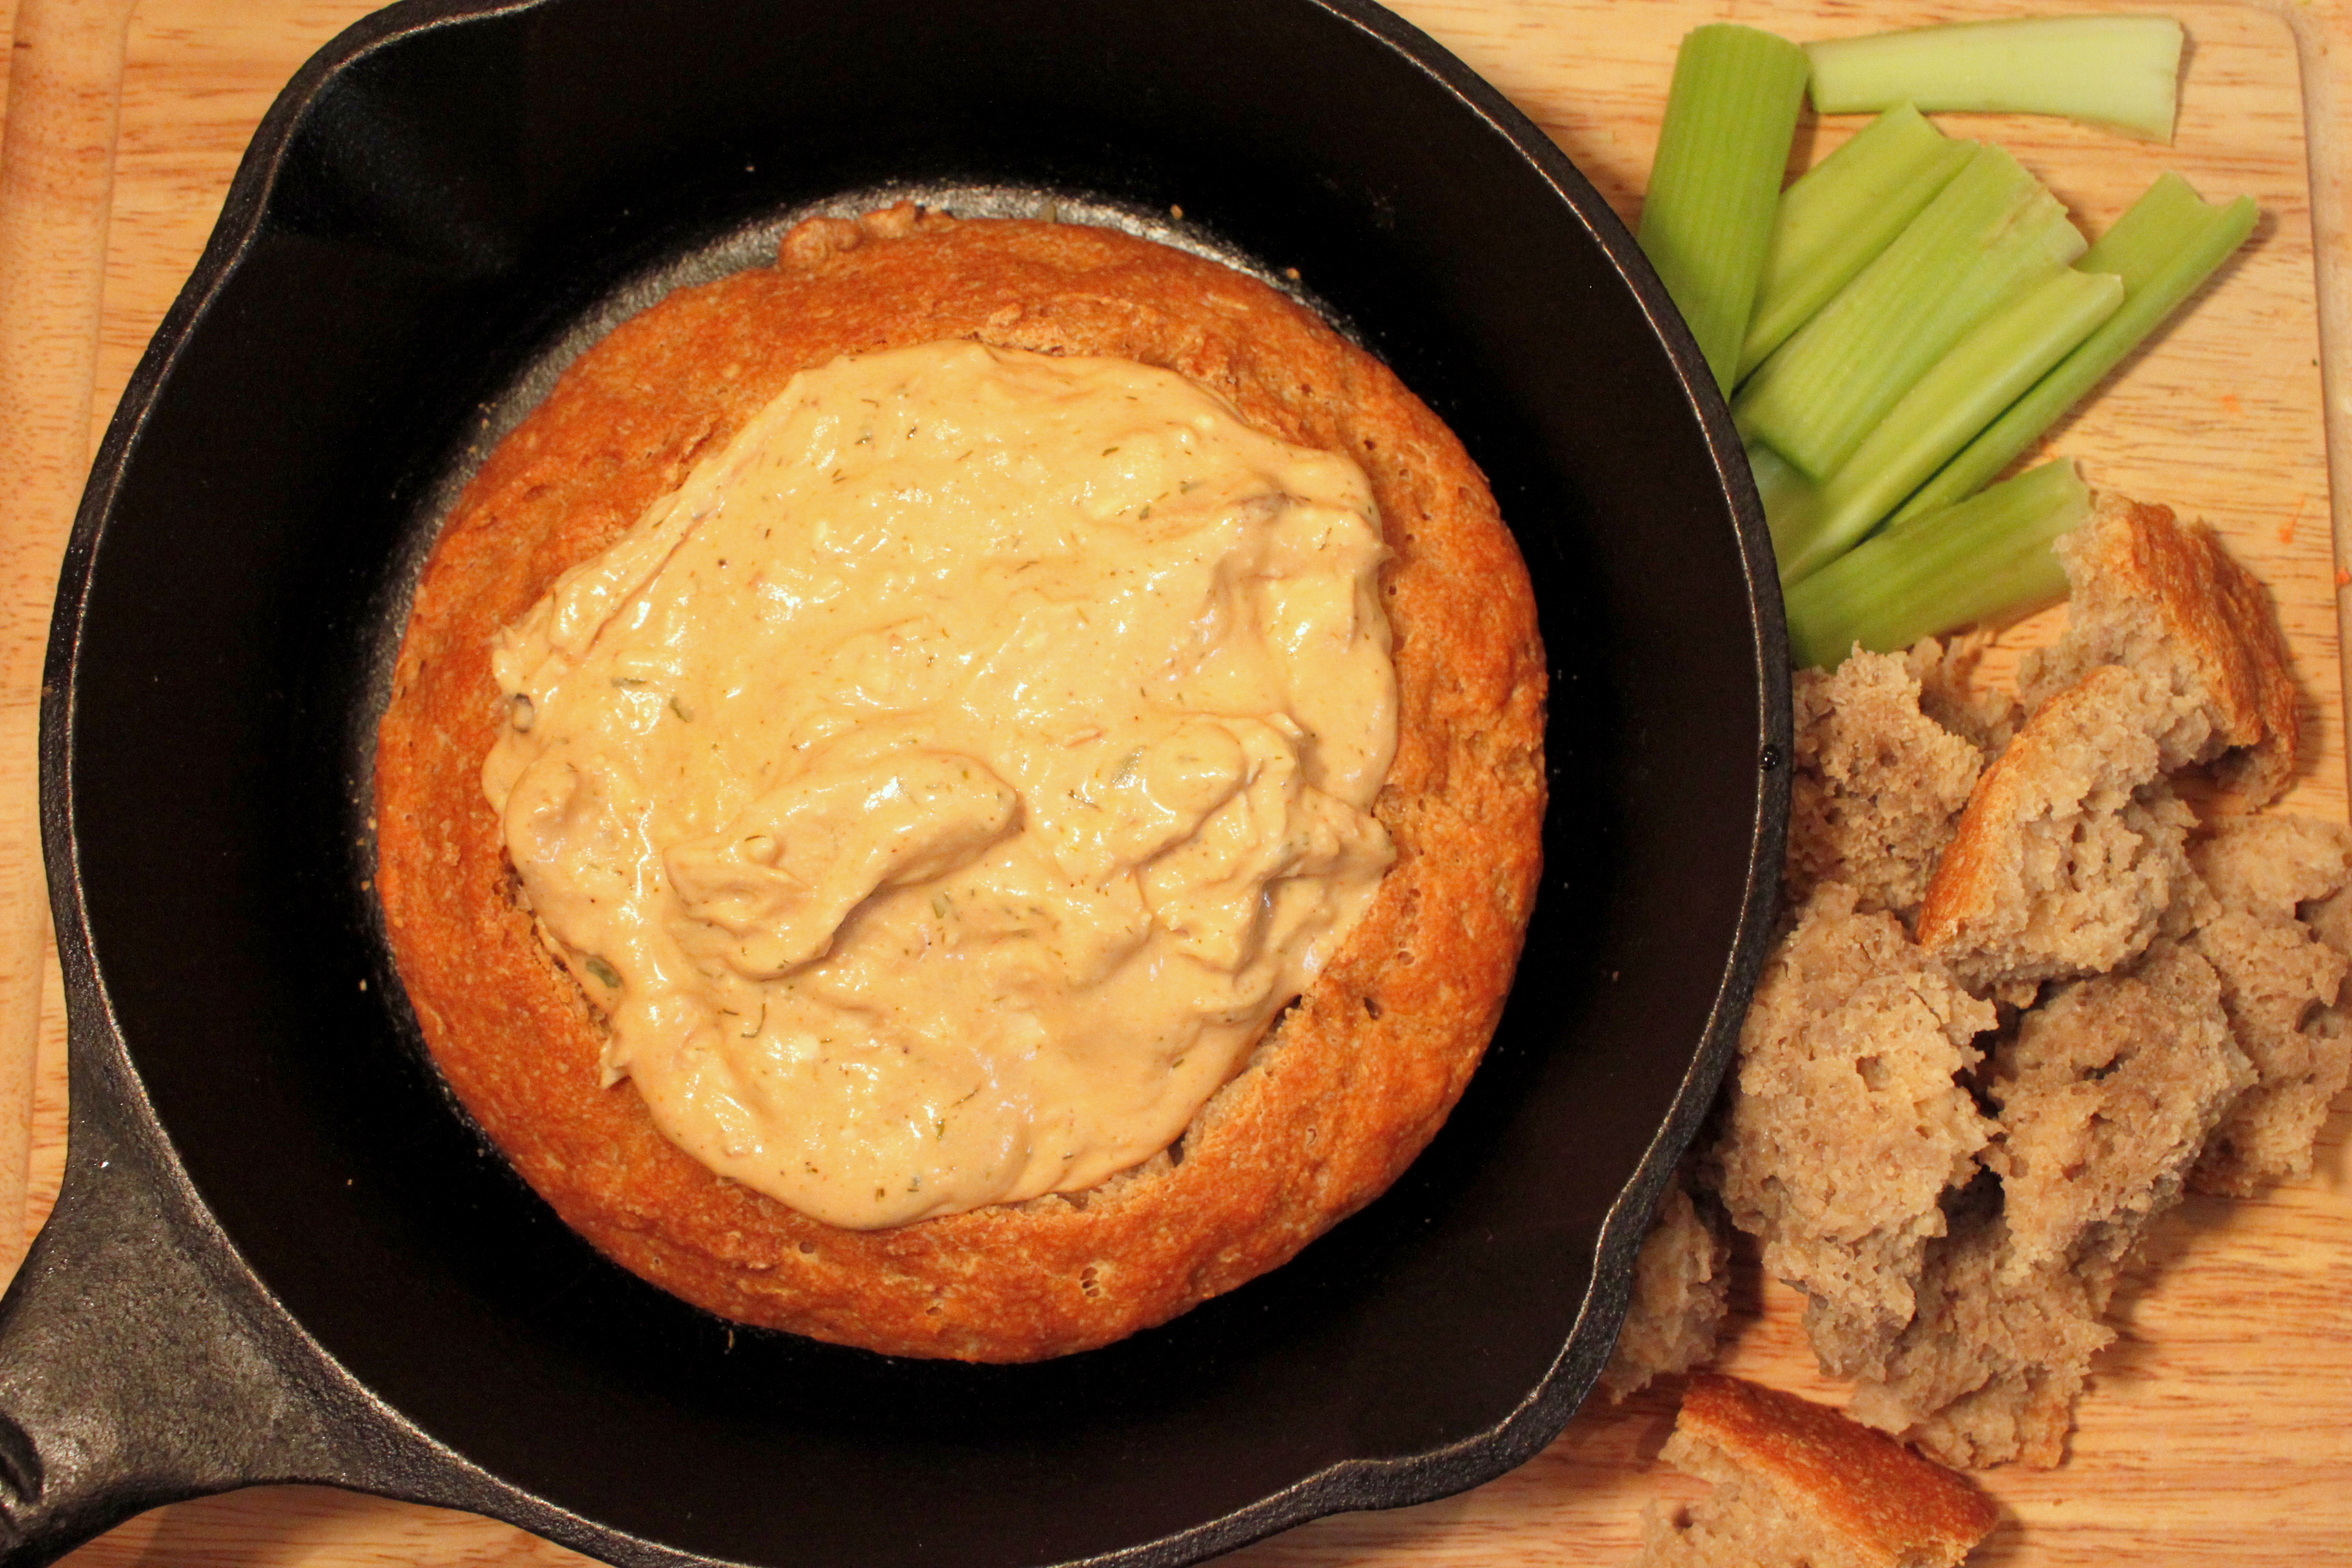
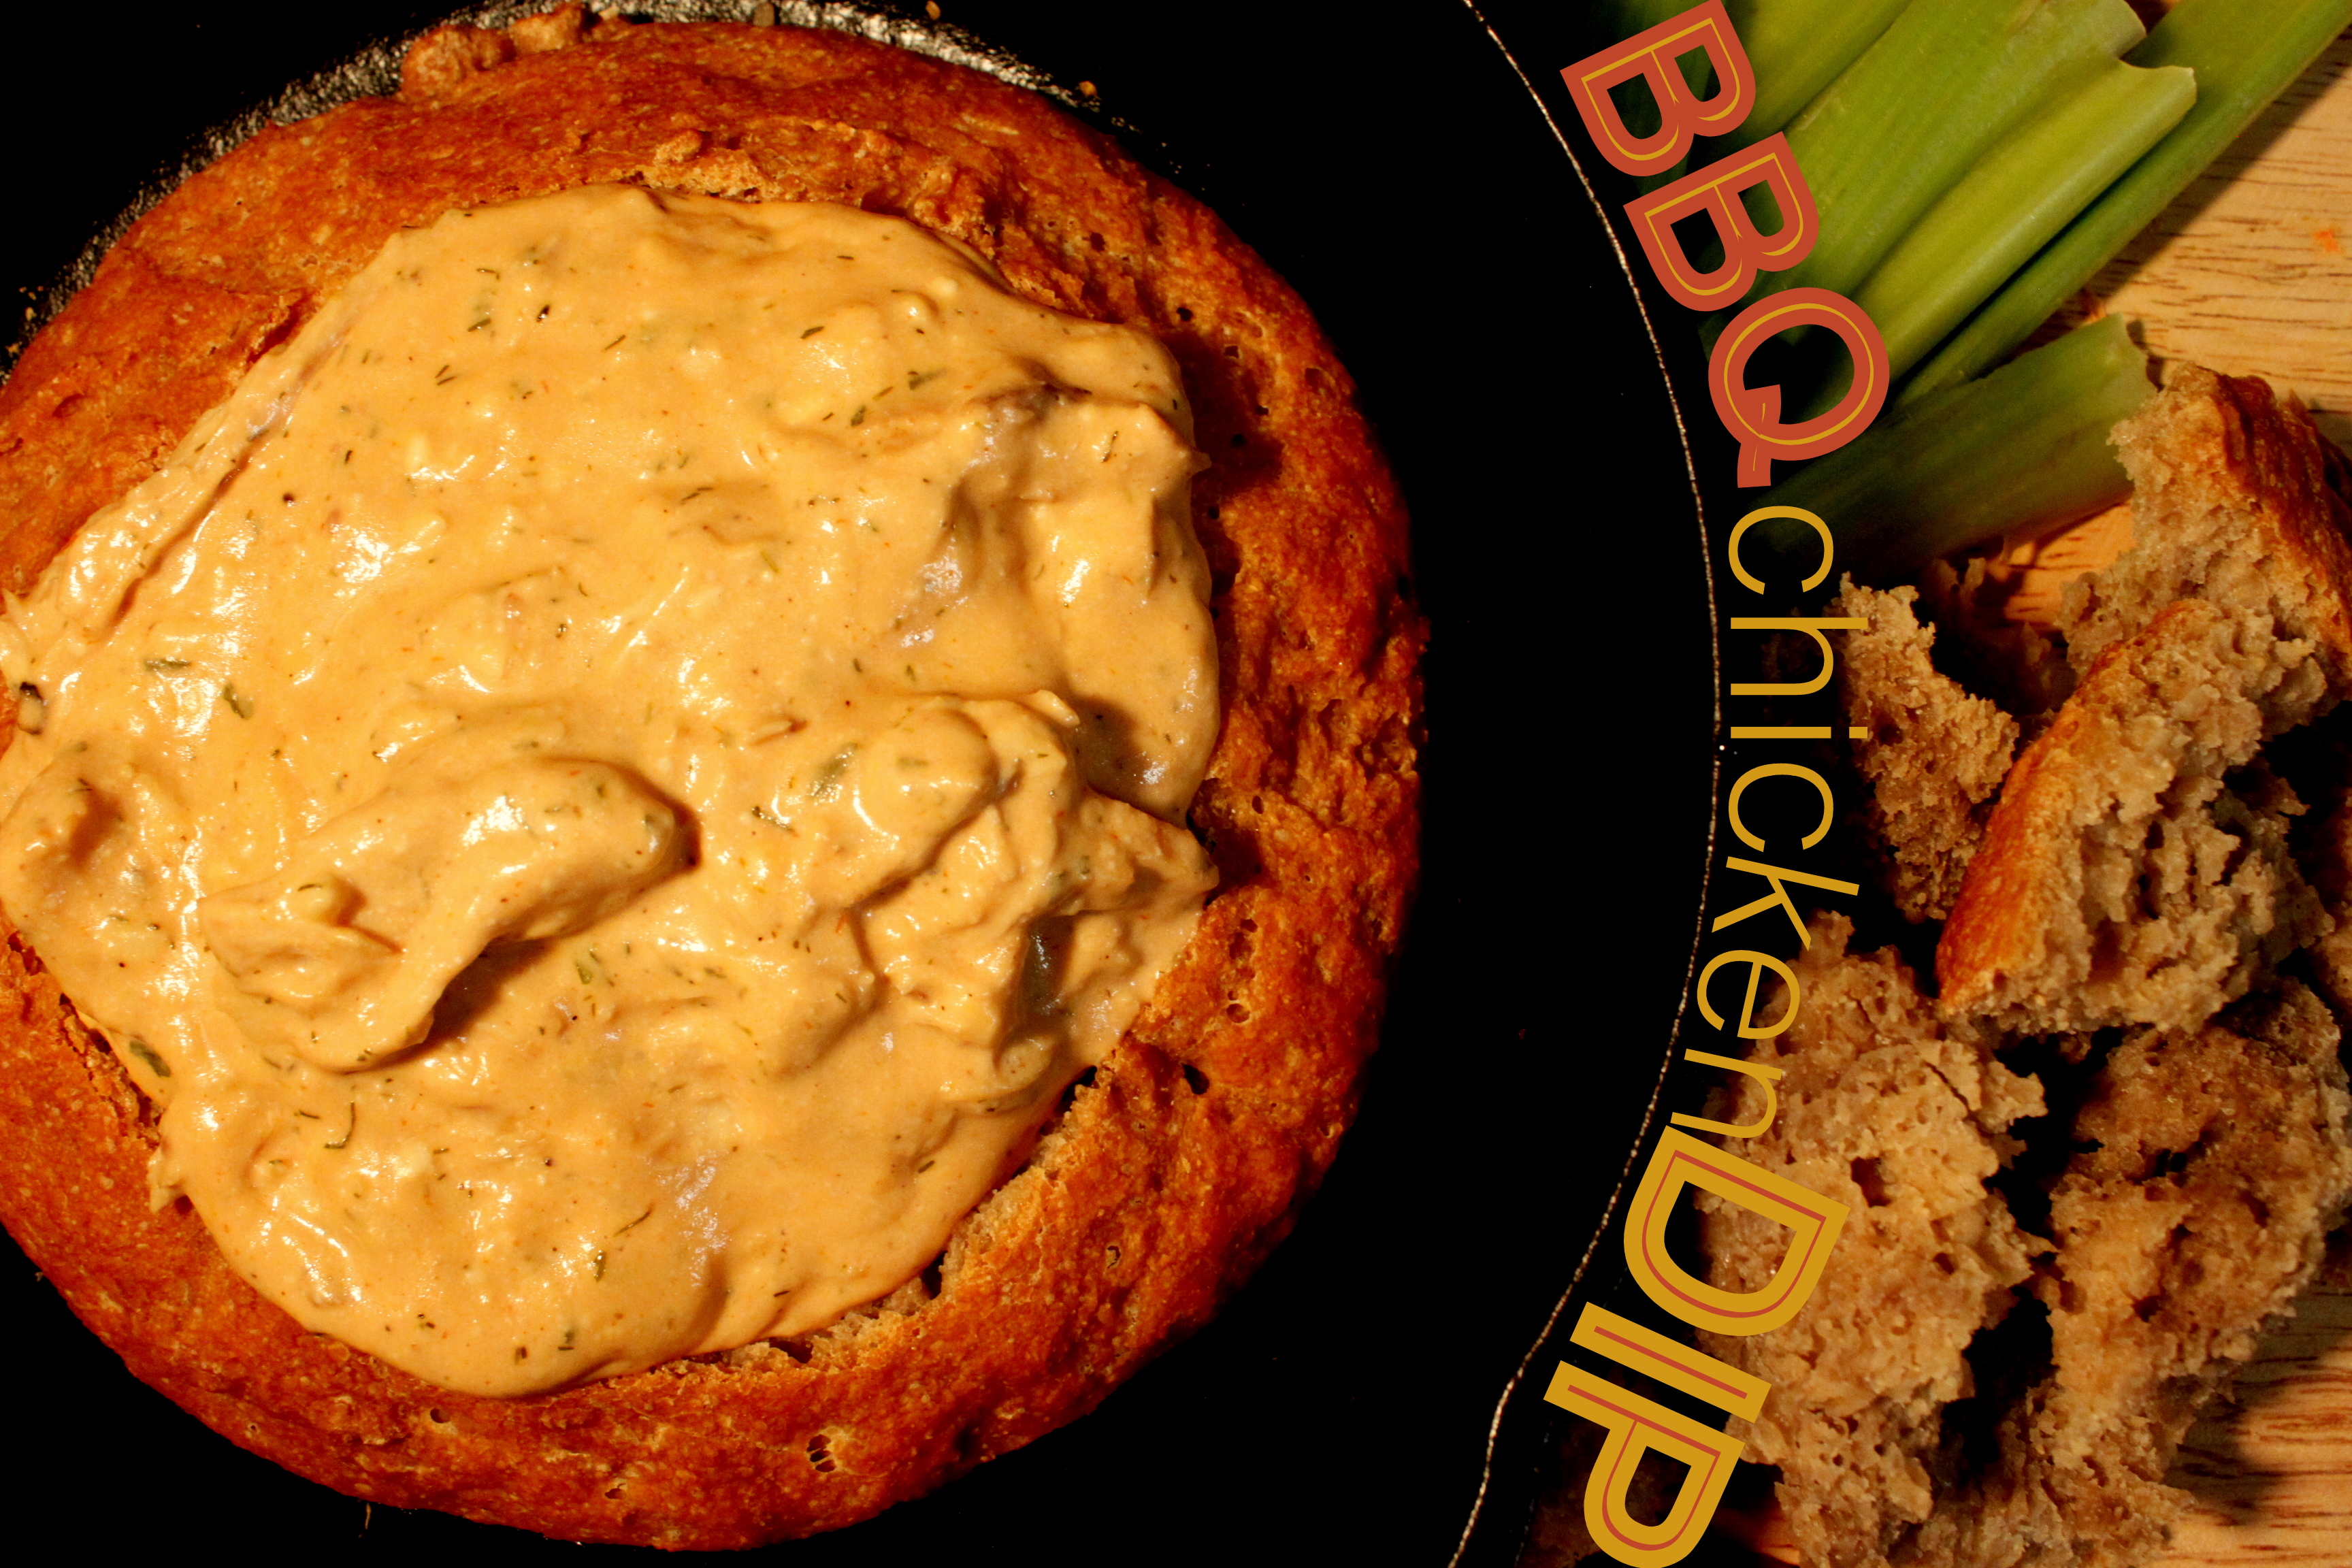
bbq chicken dip

I was actually going to call this dip “Chicken Chicken Dip“, the first “chicken” standing for the cowardly human variety, because it doesn’t have hot sauce in it. Due to sensitive tummies in my household, I never buy any because it would sit around in our fridge until it went bad (does it ever go bad?). Henceforth and therefore, we have never had Buffalo Chicken Dip, because, as you no doubt know, it has hot sauce. And we don’t eat hot sauce.

Instead, we have Non-Buffalo Chicken Dip, more specifically BBQ Chicken Dip, seeing as it’s made with BBQ sauce instead of hot sauce. It’s a milder-tasting, almost lightly sweet, version of the famous party dip, that goes just as perfectly with chunks of hearty bread, crudites, and tortilla chips. Hey, it even makes celery taste good!

I really think you should add this dip to your Super Bowl menu right now because your friends are gonna love it! If you want to be really cool, you can make a bread bowl shaped like a football. (I don’t know why I didn’t do that - I guess because I didn’t think of it until right this minute!)

One note: I wanted to try this recipe with yogurt cheese, since I’m embarking on my journey of make-your-own-dairy, but I ran out of milk and time, two essential qualities for that particular delicacy. So I bought a last-minute bar of cream cheese instead. I still want to try it with the yogurt cheese to see how it turns out; if you do, let me know! I really feel like cream cheese is just too over-processed for my taste, and would prefer the healthier version.

I did use my own homemade Ranch dressing and BBQ sauce for this recipe, which is easier if you already have some on hand, but not a huge problem if you don’t. They’re both easy to whip up in a jiffy! I’ve included the Ranch dressing in the recipe because I don’t have it anywhere else on the blog, but you can find my two favorite BBQ sauce recipes here: Quick BBQ Sauce, and Cooked BBQ Sauce.

bbq chicken dip


I served mine in a bread bowl(alas, not a football-shaped one). Of course, I used my artisan bread dough recipe, and I just baked it in a round shape in a small cast iron pan. I used up the last of my dough, so it ended up being kind of flat because I didn’t have enough - next time I will definitely use more, probably about a pound or pound and a half.

Since I made it with real ingredients (mostly, anyway), it was not quite as QUICK perhaps as regular Buffalo Chicken Dip. But I mixed up the dressings while the cream cheese was melting, so that didn’t really add much time. Still about half an hour or so from start to finish.

It’s very EASY, too. Again, the added steps of making the dressings, but nothing too overwhelming.

Cream cheese ain’t CHEAP, another reason why I wanted to use homemade yogurt cheese. Otherwise, it’s made with affordable, common ingredients that anyone can afford.

I like my HEALTHY-er version quite a bit! I love that I know each and every ingredient in this recipe - no packaged or bottled goods (with the exception of the cream cheese, which I hope to change in the future).

Linking with Tastetastic Thursday, Katherine Martinelli, and…
Cast Party Wednesday

Menu Plan Monday: Eating from my Own Blog, Whaddya Know?!

If you put “Go on a diet” or something similar on your New Year’s Resolution list this year (and who didn’t?), I invite you to join me this year as I focus on Eating Intentionally. Based on the concept of Intuitive Eating, “Eating Intentionally” means changing your mindset about food into a healthy one that benefits your whole self. I’m so excited to get started on this journey, and I’d love your company!

Today is the last day we’ll be focusing on “ditching the diet mentality”. All month long, we’ve been concentrating on not dieting. No counting calories. No measuring portions. No chastising ourselves for eating too much junk. None of it. Just enjoying our food, that’s it.

I have enjoyed relaxing in my self-given permission to just eat whatever and not worry so much about the consequences. And doing so has given me a new and different appreciation for said consequences! I think, oddly enough, that I’m starting to be more aware of how eating certain things make me feel - not guilty or mad at myself for eating it, but bloated or uncomfortable or overly full. I think this is the right direction. We certainly can’t go around always eating whatever we want without experiencing any consequences! But neither should we go around constantly at war with food.

We’ll spend some more time on similar principles later this year, but for February, we’re going to learn how to “honor our hunger”. I’ll explain what that means in more detail later this week.
Speaking of this week… there’s going to be some fun going on here at the blog! I’m going to experiment with a fun dip just in time for the Super Bowl, and I’m also working on some Valentine’s favors for the kidlets. And don’t forget about the Healthy 2Day Wednesday Link-Up, and the Sizzlin’ Soup series that will continue on Friday! If you haven’t already, don’t forget to subscribe so you don’t miss a thing! (And shh! It’s a secret! At the end of the Sizzlin’ Soup Series, my friends and I will be giving away gifts to all subscribers!)

Breakfasts

  • Buckwheat Pancakes (new recipe from my Fanny Farmer cookbook)
  • Overnight Steel Cut Oats
  • Ginger Pear Muesli
  • Muffins
  • Chocolate Sunbutter Smoothies

Lunches

  • Leftovers
  • Freezer Stash of Non-Allergenic Foods (for Certain Little Someone)
  • Sandwiches (egg salad) with Great Harvest Bakery Bread
  • Hominy & Other Leftover Soup

Dinners

  • Cheater’s BBQ, Brown Rice Pilaf, Carrots
  • Chicken Dip in a Bread Bowl (hopefully), Crudites
  • Baked Oatmeal, Bacon, Cantaloupe
  • Garlic & Potato Soup, Rolls
  • Baked Potatoes with Toppings, Fruit Salad

Snacks

  • Nuts, Raisins, Cranberries, Dried Apples
  • Popcorn
  • Going to try some white bean brownies

In My Kitchen Today

  • White Bean Brownies
  • Artisan Bread Rolls
  • Beans
  • Yogurt & Yogurt Cheese
  • Broth
In an incredibly unusual turn of events, I am actually cooking just about everything from my own blog this week. Huh. That never happens! Next week I’d better spend some time on Pinterest!

Sizzlin’ Soup: Sweet Potato Soup

Welcome back to our Sizzlin’ Soup series! Christian Mommy Blogger, Day2Day Joys, The Humbled Homemaker, Intentional by Grace, The Purposed Heart, and I are all taking turns bringing you some fresh inspiration for these cold winter nights that just beg for soup. I’ve been perfecting my recipe to share with you all in a couple weeks, but today it is Nikki (aka Christian Mommy Blogger)’s turn to bring you her favorite soup recipe.

Nikki says, “This soup has a sweet and savory balance: sweet potatoes, spinach, homemade broth and sausage combine to give you a nourishing meal that warms you from the inside out!” Curious? Check out Nikki’s recipe for Sweet Potato Soup!

Don’t forget, at the end of this series, my bloggy friends and I will be offering you a free gift with your email subscription to any of our blogs! You’re gonna love it! To be sure you don’t miss out, consider subscribing to Quick and Easy Cheap and Healthy, or any one of these other participating blogs:
Rachel @ Day 2 Day Joys
Nikki @ Christian Mommy Blogger
Erin @ The Humbled Homemaker
Leigh Ann @ Intentional by Grace
Mindy @ The Purposed Heart

Every Cook a Dairymaid: Make Your Own Dairy Products at Home

bowl of butter

photo by superfloss

I read somewhere (sorry, can’t remember where) that one of the biggest food trends in 2012 is making your own dairy products. You know, yogurt, cheese, cottage cheese, cream cheese, etc. Make-your-own-cheese kits are popping up in local grocery stores, and more than a few bloggers have posted yogurt cheese and whey tutorials.

What’s driving this interest? I don’t know. But I admit I’m one of the people that’s riding this wave to see where it goes! Before I ever even read the article about 2012 food trends, I had already decided for myself that this year that I would try my hand at making my own dairy products this year! I’ve actually already started on the process and am now an old hand at yogurt cheese (and whey!) but I have bigger mountains to climb.

In case you’re interested in being a dairymaid for a day (or even for the rest of your life), here are some tutorials that I plan to use to help me along the way.

Cream Cheese/Yogurt Cheese & Whey This is a great place to start for any dairy newbie. It’s SO easy! Don’t do it, though, if you need cream/yogurt cheese right this minute, cause it kind of takes all day. But the part where you actually have to be involved is approximately 30 seconds.

Crock Pot Yogurt I actually already make my own yogurt, and I do it the lazy way, with a machine. But a list of dairy tutorials would simply not be complete without one for yogurt. So here you have it: yogurt in your crock pot!

Brainless Homemade Yogurt Another method for homemade yogurt that’s just as easy (or even easier!).

Ricotta Cheese I don’t ever buy ricotta because it’s so expensive, but if I could make it myself, we’d eat it a lot more often.

Cultured Buttermilk, Kefir, and Sour Cream All three in one post! Awesome!

Mozzarella Absolutely my all-time favorite cheese ever. I would love to make this at home!

20-Minute Goat Cheese Another favorite that’s too expensive to buy (except at Costco where it’s pretty cheap).

Sunflower Milk Yogurt I’ve started experimenting with this, and have a ways to go. I guess that it’s technically not a dairy product, but at this point, it’s the closest thing my boys will get to yogurt! I used to make coconut milk yogurt, but since Baby Boy is allergic to coconut, that is no longer an option.

Creme Fraiche Basically cultured cream and seemingly very easy to make.

Butter These days, it’s probably the easiest dairy product to make because it no longer requires a churn. Just a KitchenAid!

Ghee Once you’ve made your butter, you can boil it down to ghee!

I’m also on the lookout for the following tutorials:

  • Cottage Cheese
  • Cultured Butter
If you have a blog post about any of those, or another dairy product you think I might like to try, please let me know!
I will keep you all posted as I experiment with these various dairy products, and let you know how it goes.
Have you ever made your own dairy?
Linking to Pennywise Platter, and…

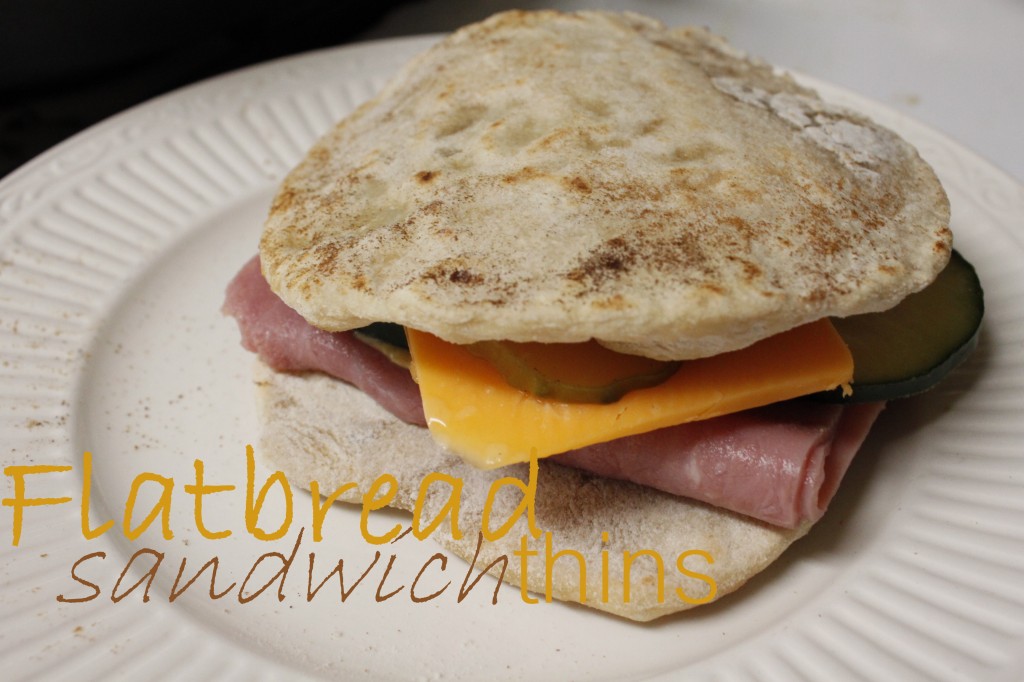
Flatbread Sandwich Thins

flatbread sandwich thins

Anyone who’s been around here for a while knows of my love affair with 5 Minute Artisan Bread. I truly believe it is the easiest way for the average home cook/chef/baker to make their own delicious, healthy bread for their family. It saves money, and it really is pretty much the quickest way to make bread.

But to be honest, I rarely make loaves with it. Plain old sliced bread is just so yesterday. Instead, I usually make sliders , dinner rolls, pizza crust, pocket sandwiches or flatbread with it. Each option is so super simple and a lot less fussy than a loaf of bread. You know, all those technical terms about crumb and crust and fermentation blah blah blah. I’m not into all that. It takes too much time, effort, and skill that I just don’t have.

I just like to make bread that’s tasty and healthy and not too complicated. And although I love the master “healthy” bread recipe in Healthy Bread in 5 Minutes a Day, I stumbled a while ago across an even easier and less complicated artisan bread dough recipe that is just as versatile.

I always - always - have a batch of this dough in the fridge, ready at a moment’s notice for whatever bread-like goodness I want to whip up, which just adds to its attractive qualities. Recently, I found yet one more use for this amazing bread dough: mini flatbreads. They are reminiscent of sandwich thins, although not exactly the same thing because the official sandwich thins are technically smooshed rolls, and these are definitely flatbreads. Two different things.

But I like to think these are even better. Flatbread is my favorite all time form of bread because it’s so soft, and yet a bit chewy. But it doesn’t necessarily make a great sandwich because it’s usually too thick to fold effectively like a tortilla into a taco or burrito shape. And way too floppy to stack on top of another piece to form a real sandwich shape. Enter the mini flatbread: all the yummy taste and texture of traditional flatbread, but miniaturized to make the perfect sturdy little sandwich.

Trust me. It’s way better than sliced bread.


Notes:

  1. The ginger is a dough conditioner and is totally optional. It does not add flavor.
  2. You can also use 1 or 2 TBSP of orange juice as part of the liquid; according to King Arthur Flour, orange juice improves the texture of whole-wheat-flour bread dough. Once again, it doesn’t affect the flavor.
  3. You can make a few flatbreads at a time, as you need them, and store the remaining dough in the fridge.
  4. This recipe is halved. You can double it all except the yeast, which only increases to 1.5 TBSP.
  5. This recipe really is truly best when the ingredients are weighed. I use the EatSmart Digital Kitchen Scale. I also like to sift the flour through a mesh strainer as I’m pouring it into the bowl; it really creates a lighter finished product.
  6. I even make an allergen-free version using this recipe for gluten-free egg-free artisan bread.
Fill your mini flatbreads with whatever filling you would normally put between regular sandwich bread slices!
Don’t be put off by the lengthy instructions and storing bread dough in the fridge: this really is QUICK! Stove-top flatbread is pretty much the quickest ever way to make bread. And making the dough easily becomes part of your weekly (or bi-weekly) routine; at least it has for me!
It is soooo incredibly EASY also. If loaf bread scares you, then try this!
Making your own bread is so much CHEAPer than buying it. I typically buy 10 lbs of flour every 6 weeks, and it costs me (at most) $6.00. This flour not only makes all my bread, but all my other baked goods as well. So my DH and myself get all our bread (including dinner rolls and pizza crusts) for less than $1 a week. (My children are another story. Let’s not discuss the cost of wheat-free flours.)
And it goes without saying that this bread is considerably HEALTHY-er than the vast majority of breads available in the store. And the ones that might be healthier are also quite heftily expensive, so take that into consideration.
HearthTempt my Tummy Tuesdays

Menu Plan Monday: In Which I Eat a Lot of Chocolate Chips

If you put “Go on a diet” or something similar on your New Year’s Resolution list this year (and who didn’t?), I invite you to join me this year as I focus on Eating Intentionally. Based on the concept of Intuitive Eating, “Eating Intentionally” means changing your mindset about food into a healthy one that benefits your whole self. I’m so excited to get started on this journey, and I’d love your company!

This month in Eating Intentionally, we’re focusing on “ditching the diet mentality”. In other words, no dieting. No counting calories. No measuring portions. No chastising ourselves for eating too much junk. None of it. Just enjoying our food, that’s it.

How’s it going for you? It might be going a little too well for me! I’ve given myself permission to eat whatever… and I pretty much eat whatever! Lately, I’ve been having the most terrible cravings for chocolate, so I’ve been indulging in it more than I probably should.

It might seem counter-intuitive, but there is definitely a method to this madness, and a reason behind the craziness. The point is to disassociate yourself from negative feelings about food: “this is bad for me; I shouldn’t eat it; I shouldn’t eat very much of it; I feel so guilty for eating this”. This exercising in “ditching the diet mentality” is intended to neutralize your relationship with food so that you can get to a healthier place where you and food get along peaceably. The first step is to remove all the critical, negative feelings and thoughts you have about food.

I’m totally there. Bring on the chocolate chips, baby!

Breakfasts

  • Pancake Apple Butter Sandwiches
  • Overnight Steel Cut Oats
  • 1-2-3 Granola!
  • Muffins (I plan to try a new recipe.)
  • Sweet Potato Rice Pudding

Lunches

  • Leftovers
  • Freezer Stash of Non-Allergenic Foods (for Certain Little Someone)
  • Sandwiches (nitrate/nitrite-free deli meat) with Homemade Sandwich Thins (recipe coming soon!)
  • Hominy

Dinners

  • 5-Spice Braised Chicken in the Slow Cooker, Couscous, Moroccan Carrots
  • Chicken & Dumplings (so I can perfect my slow cooker recipe!)
  • Whole Wheat Fruit Pizzas*
  • Stove Top Mac n Cheese, Fresh Veggies and Fruit
  • Paninis, Carrot Sticks

Snacks

  • Nuts, Raisins, Cranberries, Dried Apples
  • granola bars
  • Skinny Monkey cookies
  • Whole Wheat Chocolate Chip Cookies*

In My Kitchen Today

  • 1-2-3 Granola
  • Artisan Bread
  • Beans
  • Hominy
*These recipes are from Smart Sweets, the latest eBook by Katie at Kitchen Stewardship. It’s on sale now 10% off with the code FB10OFF!!!

Sizzlin’ Soup: Sausage and Kale Italian Zuppa

I am so glad we’re doing this soup series now! For one thing, I am freezing my tail off even inside my apartment (I am no engineer, but I’m seriously beginning to wonder if that earthquake did some damage to the building structure! When it’s cold outside…. it’s cold inside!). Soup is just the thing to warm me up. For another, I have been in such a soup rut - potato soup and chicken noodle soup have been taking turns on my menu rotation for a while. Time for some inspiration!

Rachel from Day2Day Joys will be sizzlin’ up some Zuppa this week. What is Zuppa? Click here to find out and to get the recipe for this Italian favorite. It’ll be sure to spice up the sizzle in your soup recipe stash!

Don’t forget, at the end of this series, my bloggy friends and I will be offering you a free gift with your email subscription to any of our blogs! You’re gonna love it! To be sure you don’t miss out, consider subscribing to Quick and Easy Cheap and Healthy, or any one of these other participating blogs:
Rachel @ Day 2 Day Joys
Nikki @ Christian Mommy Blogger
Erin @ The Humbled Homemaker
Leigh Ann @ Intentional by Grace
Mindy @ The Purposed Heart

Something From Nothing: Dried Orange Zest

something from nothing graphic

A large part of frugality is being careful about what you spend. You know, don’t waste your grocery money on Twinkies and Oreos and then say you can’t afford organic fruits and vegetables.

But an often overlooked aspect of frugality is being careful with what you already have. As our grandparents said, “Use it up, wear it out, make it do, or do without.” Our generation is just starting to grasp this concept, but we’ve got a long way to go. Take a clue from those who lived through the Depression and the Great War, and learn to use up every last bit of everything before you throw it out.

Personally, I find it a rather fun challenge to see if I can find a new use for something that I used to just mindlessly throw away. For example, making an elegant dessert out of stale bread, or turning egg cartons into gift packaging. Or turning orange rinds into gourmet orange peel granules. Sure, you could pay $9 for someone else’s orange peel trash… or you could make your own and save your $9.

orange peel

Trash into treasure. Something from nothing. It’s like you’re a magician.

The process is pretty simple. All you have to do is this:

  • If your orange is not organic, wash it very carefully before peeling it.
  • Peel your orange (or clementine, or tangerine) and eat it. Yum, yum!
  • Take the pieces of the peel and lay them on a plate. Leave them there for about 24 hours.
  • Run the dried orange peel through a coffee grinder (A clean coffee grinder, please. You don’t want coffee grinds mixed in with your dried orange zest!)
  • Store in an empty spice container (see all the trash you’re turning into treasure?!)
You can also store the dried orange peels in their entirety, and just grind them as you need them. Whatever’s easiest!
The people who know (those gourmet foodie types) recommend removing the pith (that white stuff that sticks to the inside of the peel) to avoid a bitter aftertaste in your orange zest. This is great advice that I usually don’t follow. Personally, I think it’s only a real issue if you’re going to simmer the peels for a long time in something like broth or spiced cider. (Or maybe it’s because I only ever use clementines. I hate oranges with a passion, mostly because they have a lot more pith and membrane than clementines. I mean, by the time you get to the good stuff, you’ve discarded half the orange!) But if you want to take that extra step, I actually recommend that you remove the pith after it’s dried and not before. It scrapes off really easily with the back of a small paring knife when it’s dry. At least with clementines. As I mentioned, I have no experience with real oranges because I avoid them like the plague. (Maybe I should retitle this post “Dried Clementine Zest”. Hmmm.)
Now what to do with those orange-y bits of goodness? Use them pretty much in the same way you would use fresh orange zest. Here are some of my favorite uses:
  • in simple syrup
  • in homemade coffee creamer
  • mixed and brewed with coffee grinds
  • stirred into pancake batter
  • stirred into any batter (cake, cookie, brownie, etc.)
  • as a garnish
  • in fruit dip
  • in marinades
The possibilities are practically endless! Anywhere you want a little orange flavor, throw in your dried orange zest and voila! Instant orange clementine yumminess.
What’s your favorite something-from-nothing trick?
Linking up to Monday Mania, and…
Homemakers Challenge


For My Vegan Friends: Black Bean Stuffed Sweet Potatoes

Black Bean Stuffed Sweet Potato

First, let’s get something straight. I am not a vegan. I have tasted life without cheese and I didn’t like it. I won’t go back voluntarily. However, on Facebook recently, I asked my readers to give me some ideas for recipes to post in January; and to my surprise, several people requested vegan recipes.

Huh.

I am not entirely a stranger to vegan cookery - having a child who is allergic to beef, dairy, and eggs kind of thrust me in that general direction on occasion when searching for recipe inspiration. In fact, my favorite ever chocolate chip cookie recipe is Happy Vegan Chocolate Chip Cookies. I suppose if I were a vegan, I could forget about the cheese if I could eat those cookies all day long. Maybe.

In any case, as it happens, I do have a vegan recipe to share with you, my vegan friends! I bet you’re not surprised that it involves beans. And sweet potatoes! The two together work some pretty awesome magic, let me tell you. I started with this recipe for black bean stuffed sweet potatoes, and then livened it up just a bit.

If you’re not vegan (or dairy-free, if that’s the case), you can un-veganize it by dressing it up with a little cheese (you know what my choice is!) and sour cream if you’d like. But honestly, they’re delicious as they are. Even without the cheese. (Really.)

Black Bean Stuffed Sweet Potatoes


The bean filling here, folks, is kickin’ awesome, I can assure you! I could eat that on its own endlessly. Thank goodness my boys were there to stop me, or they might not have had any lunch.

Black Bean Stuffed Sweet Potatoes

This is QUICK if you have cooked beans on hand. (I like to freeze extras, or I make them on a day when I have extra time in preparation for a meal like this.) If you don’t have cooked beans on hand, you’re going to have to plan ahead: soak them overnight the day before you plan to make this dish, then cook them in the slow cooker all day until you’re ready to get started with this recipe. Once you’ve got cooked beans to start with, you can make the black bean filling while the sweet potatoes are baking in the oven. Dinner will be ready in an hour or less!

It’s very EASY, for sure. In fact, it’s a one-pan meal, so that means very little clean up!

Both beans and sweet potatoes are super CHEAP, so this one’s a frugal winner in my book.

You’ve never seen so much HEALTHY packed into one little dish! You’ve got the Super Food Sweet Potato, combined with Vegan Protein Extraordinaire (otherwise known as beans), all wrapped up with antioxidants and vitamins from the cute little veggies and spices.

Sharing at Tastetastic Thursday. Frugal Food Thursday,
Miz Helen’s Country Cottage

Batch Cooking for the Busy (Lazy?) Mom

I’ve always admired Tricia from Once a Month Mom and Jessica from Life as Mom for their uber-organized approach to meal planning and preparation. Both of these women are vast proponents for Once-a-Month-Cooking, wherein you prep enough food to last for a month, then freeze it so that all you need to prepare for dinner is grabbing a pan from the freezer and put it in the oven. It is like buying a whole cart-full of microwaveable frozen dishes, only a lot healthier.

The concept appeals to me, and every time I read about it, I nod my head in agreement and think to myself, “Yeah, that’d be great!” I even grocery shop once a month, so it’s perfectly feasible for me.

Or so one would think. It turns out that I am either lazy, inept, totally unorganized, or just plain chicken. For the life of me, I cannot even begin to garner enough motivation to begin the process of OAMC, as it is called. It involves compiling the menu, checking for ingredients, making a grocery list, shopping for all the food, and then setting aside a time to prepare the food. I’m wiped out just thinking about it, let alone doing it.

Today I’m at Homemaker’s Challenge, sharing how I get the benefits of OAMC without all the extra work - read there about my simple mini-batch cooking and prep-ahead process!

Interesting reads