Archives for October 2013

5 Apple Side Dishes

5 Apple Side Dishes

photo credit: Alvimann

If you follow me on Instagram, you’ll have noticed that we’ve been eating a lot of apples lately. And I mean a LOT. Alotalotalotalotalot. That is because:

  1. They are in season.
  2. Therefore they are cheap.
  3. They are versatile.
  4. They are yummy!
  5. They are super fast to fix.

Only problem is… when you are facing sliced apples on your plate for the tenth meal in a row, you start to wonder if there is a better way. And, of course, there IS a better way. And you can find it on Pinterest.

So here we have - more for my sake than anything else, mind you - my top 5 apple side dish pins. (Note: there are quite a few more pins where these ones came from, namely my Salads and Veggies Pinterest board. These are the ones that looked the best to me and that I will definitely be trying, as opposed to the ones that will probably languish on my Pinterest board for years to come.)

Apples

Photo Credit: Marylee

1. Roasted Apples

This one is going first because it’s the one I’m most likely to make. You will notice there’s nothing particularly fancy or exciting about it, other than the fact that the apples are roasted rather than sauteed or pan-fried or boiled or mashed, etc. I don’t believe I’ve ever roasted apples before, but I’m definitely going to give it a go, using this recipe for Roasted Apples from Cooking in Stilettos as a guide.! But I will use less sugar, and it will be coconut sugar.

2. Apple-Carrot Stir Fry

Carrots are another common occurrence around here, so why not try the two together? I love the “stir fry” concept in this recipe from Better Homes and Gardens, although, once again, I’ll reduce/eliminate and substitute the sugar. I might even try maple syrup or honey and see how that goes.

Slicing an Apple Photo Source: cohdra

3. Paleo Fried Apples

I make fried apples fairly frequently (just fried up in some coconut oil and sprinkled with cinnamon), but I love the idea of adding a little coconut milk to the apples. Try the Paleo Fried Apples from Jen’s Natural Kitchen.

4. Orange Cran-Apples

This combo sounds like Christmas to me, and I love Christmas, so I think I’ll love this dish: Orange Cran-Apples from Eat it Up. I have never bought canned cranberries (honestly didn’t even know there was such a thing!), but I think fresh, frozen, or dried would work just as well here.

5. Parsnip Apple Mash

This one’s a bit of a stretch for my family because we eat parsnips on occasion… but we don’t love them. For some reason, though this Parsnip Apple Mash from BBC’s Good Food intrigues me with the cumin and coriander. If it’s got cumin in it, I’ll probably love it! I imagine other root veggies and/or squashes would work well in place of the parsnips, although I do want to try it with them, parsnip aversion notwithstanding.

For more apple inspiration, see what else I found by browsing through my Salads and Veggies board. Or take a gander at the apple recipe posts from right here on Authentic Simplicity:

A Redeemed Jack-O-Lantern

As much as I love to cook up a good pumpkin and throw it into just about everything, I’ve found that there are other - non-culinary - uses for those big fat squashes that might not be edible, per se, but are just as much fun.

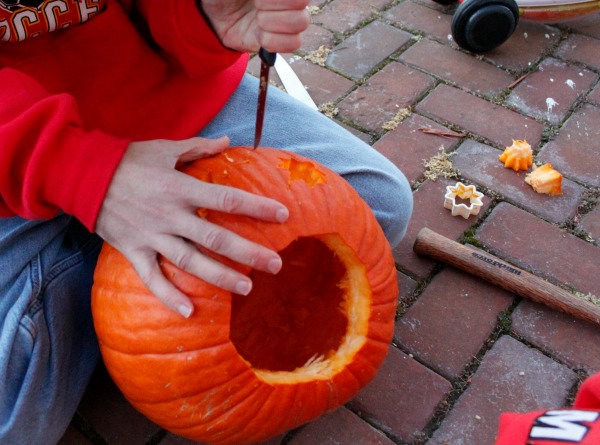
This Redeemed Jack-O-Lantern, for example. I found the instructions in the files left by the previous K3 teacher in my classroom, and found further inspiration in the fabulous children’s book, The Pumpkin Patch Parable (that right there is an affiliate link), written by one of my favorite authors, Liz Curtis Higgs (That is not. An affiliate link, I mean.). Instead of glorifying death and fear, it celebrates life and hope; and it radiates faith. That’s my kind o’ pumpkin!

How a Jack-O-Lantern is Redeemed

  1. Choose a big fat pumpkin, the best you can find. No bitsy pie pumpkins this time around! “… just as He chose us in Him before the foundation of the world…” Eph 1:4
  2. Use a sharp knife to cut a lid out of the top of the pumpkin, making it large enough for you to fit your hand in comfortably.
  3. Scoop out all the icky yucky slimy junk stuck inside the pumpkin. It kind of reminds one of all the yuckiness (aka, sin) that resides in each of our hearts. “What comes out of a man, that defiles a man. For from within, out of the heart of men, proceed evil thoughts, adulteries, fornications, murders, thefts, covetousness, wickedness, deceit, lewdness, an evil eye, blasphemy, pride, foolishness. All these evil things come from within and defile a man.” Mark 7:20-23
  4. Throw away the icky yucky slimy junk. (If your frugal heart cannot bear to part with the seeds… save them discreetly! The eliminating of the yucky junk is an essential element of the redemption illustration.) “If we confess our sins, He is faithful and just to forgive us our sins and to cleanse us from all unrighteousness.” I John 1:9
  5. Take a star-shaped cookie cutter and place it on the pumpkin in the general approximation of where it would have eyes if it were a face. Use a hammer to tap the cookie cutter into the pumpkin, and remove the star shaped piece of pumpkin to reveal a star-shaped eye. Repeat for the second eye. (Note: Plastic cookie cutters work, but metal cookie cutters work better. And if you have neither, just use a sharp knife and free-hand it.) Because our sin separated us from God, He had to redeem us. He sent His Son Jesus to earth to live a perfect life and be the perfect sacrifice for our sin. He announced the arrival of His Son on earth with, among other things, a very special star. “Now after Jesus was born in Bethlehem of Judea in the days of Herod the king, behold, wise men from the East came to Jerusalem, saying, “Where is He who has been born King of the Jews? For we have seen His star in the East and have come to worship Him.” Mat 2:1-3
  6. Use the sharp knife to cut a cross-shaped piece where a nose would be on your pumpkin’s face. God’s redemption plan culminated in the death of Jesus on the cross and His subsequent resurrection. “Without shedding of blood there is no remission.” Heb 9:22
  7. Use a fish-shaped cookie cutter (What? No such thing in your house? Just use a knife.) and a hammer to punch out the mouth of the pumpkin face. No Bible verse here, but a little bit of Christian history: the persecuted early church used a fish as a symbol whereby they identified one another. Hence it is now a symbol of our belief and faith in Jesus Christ as our Redeemer.
  8. Place a tea light candle (I like the fake ones from the dollar store) inside the pumpkin and watch the light shine through the pumpkin’s face. “Let your light so shine before men, that they may see your good works and glorify your Father in heaven.” Mat 5:16

And that’s how a pumpkin (and a person) is redeemed.

Five Ways to Cook a Pumpkin

5  ways to cook a pumpkin No matter what kind of pumpkin you have, how much time you have, or what sort of equipment you have… there is a way to cook your pumpkin!

On the Stovetop

Say whaaaa? Why yes, dearie, you can cook that beauty right on your stove top! My friend Jackie shares the instructions on her blog, Blessings Overflowing. Now this method requires hacking the pumpkin apart first unless you have a pretty small pumpkin and a pretty big pot, so I’d recommend using this method in the following circumstances:

  • If you have limited time - At approximately half an hour of actual cooking time, you’re looking at less than an hour start to finish. This is one of the quickest pumpkin-cooking methods so it’s ideal if you don’t have a lot of time. On the other hand, cooking on the stove top requires a little more involvement on your part, so if your limited amount of time has to be shared with other tasks, this might not be a good idea. Burned pumpkin, anybody?
  • If you have a sharp knife and a strong arm - You’ll have to cut the pumpkin into chunks, which will take some effort depending on the kind of pumpkin you have.

In the Oven - Chopped

Jackie has another trick up her sleeve: cooking the pumpkin in the oven. This is about the same involvement as cooking on the stovetop: you need to cut the pumpkin in pieces (half will do if you have smaller pumpkins), put them in a pan with some water, and then cook it for a while. The cooking time is considerably longer, though. This method is a good one if:

  • You have a really big pumpkin - If you like to cook up your jack-o-lantern, this is probably the best way to do it because the oven is likely to be the largest cooking receptacle you have access to. Also, you can use large roasting pans, or multiple pans like Jackie did.
  • You have a little more time - The oven takes an hour and a half or so to cook through a pumpkin at 350F, so calculate that into your schedule.

In the Oven - Whole

My friend Mindy has another approach to cooking pumpkins in the oven: she cooks them whole, no chopping or hacking. You will like this way of cooking pumpkins if:

  • You dislike hacking pumpkins - Ooh oooh, pick me! Pick me! I avoid this at all costs, so if you’re anything like me in that regard, you’ll like this method, too.
  • You have a smaller pumpkin (i.e., a pie pumpkin for example) - If your pumpkin is very large at all, you’ll want to cut it at least in half before attempting to cook it in the oven; but if your pumpkin is of the sugar or pie pumpkin variety, this is perfect for that.

Steamed

Here’s a variation on the stovetop twist: steam the pumpkin instead of boiling it! You might like to try it if:

  • You have a large steaming basket and pot - I don’t, so I can’t try this. Boo.
  • You want to preserve as many nutrients as possible - If you plan to further cook the puree, in my opinion, this is kind of a moot point. But if you’re going to use the puree fresh - in smoothies, for example, or a dip - you’ll be able to enjoy the nutrient-rich pumpkin to its fullest using this method.

Cook Pumpkin in Your Slow Cooker In the Crock Pot

This is my new favorite pumpkin-cooking method! I don’t know if I’ll ever cook a pumpkin in any other way, to be honest. It’s SOOOO easy, and right now, I need easy. E_A_S_Y. You can find the instructions here: How to Cook a Pumpkin in a Crock Pot. You will want to cook your pumpkins this way if:

  • You are short on time - OK, so the actual cooking time still takes a couple hours. But that is hands-off time. The amount of time you actually spend baby-sitting your pumpkin with this method? The amount of time it takes to wash it, poke it, and place it in the crock pot. Maybe a minute? Then you’re free to do other things, even leave the house if you need to (just be sure to be back in the right amount of time!).
  • You have a long time - I know; those things seem to contradict each other, don’t they? But the fact is, you do need at least 2 hours. So if you only have 2 hours TOTAL, and you need cooked pumpkin PLUS pumpkin-something-else, go with option #1.
  • You don’t like hacking pumpkins - Me. Either. Hence I really like this method. All you have to do is give a few little pokes. Easy peasy!
  • Your pumpkin is on the small side - Once again, you’ll need pie pumpkins for this method. The jack-o-lantern is just not gonna fit. And bigger pumpkins might still need to be cut in half or even smaller. But most pie pumpkins should fit nicely in a 5qt slow cooker.

Now how about that? A pumpkin cooking method for every possible need! Better go buy a pumpkin while they’re still available!

Old-Fashioned Pumpkin Donuts

Old Fashioned Pumpkin Donuts You know that super simple, super quick “donut” recipe that’s been going around for a while? The one where you open a can of biscuits, poke a hole in the middle, then fry it up and call it a donut?

Well, this is kind of like that. Except we don’t do canned biscuits around here, so the biscuit dough is fresh from scratch. (SO easy!) Oh yes, and it’s flavored with pumpkin and pumpkin spices so it’s perfect for fall weather.

Think you like the sound of that? (I know I do!) Then head on over to Baking Whole Grains to get the recipe for my Old-Fashioned Pumpkin Donuts!

Cook Pumpkins in your Crock Pot

Cook Pumpkin in Your Slow Cooker True story: I had read this post at Stacy Makes Cents about cooking spaghetti squash in your slow cooker. Apparently, after reading it, my mind automatically replaced the spaghetti squash with pumpkin… which isn’t all that odd come to think of it, since I really don’t love spaghetti squash but I do looooovvvee pumpkin! Anyway, a few days later, I popped a pumpkin into my crock pot and posted a pic of it on Instagram, and was kind of surprised by the reactions that I received on Facebook (where all my Instagram photos instamatically appear). Everyone was asking me for directions and what I did with the pumpkin once it was cooked, so I went back to Stacy Makes Cents and searched for her post about cooking pumpkins in the crock pot.

Except that Stacy doesn’t have a post about cooking PUMPKINS in the crock pot. I searched and searched and searched every way I knew how on Stacy’s site. Then I searched on Google. Then I searched my browser history. I COULDN’T FIND THE DUMB POST ANYWHERE!!! (Pardon me for yelling, but I was extremely frustrated at this point.)

So in desperation, I asked Stacy herself. At this point, since I couldn’t even find it in my browser’s history, I was beginning to think I had dreamed the whole thing. Stacy very kindly informed me that she had indeed posted instructions… for cooking a SPAGHETTI SQUASH in the crock pot.

Oh.

Duh!

Silly me! Cook Pumpkin in Your Crock Pot

How to Cook a PUMPKIN in Your Crock Pot

So here is a post about cooking a PUMPKIN in your crock pot. Now if you google cooking pumpkins in your crock pot (Which I have. More than once.), you will find that everybody - and I mean everybody - tells you to cut your pumpkin apart before putting it in the crock pot. I say No Way! Cutting a pumpkin is hard work, and I prefer to work smarter, not harder. The trick is to purchase pumpkins that are small enough to fit in your crock pot - I’ve found that most of the Pie Pumpkins available will fit perfectly, although some need to have the stem cut off. If you want to cook up your jack-o-lantern pumpkin, well then, you’re on your own, honey. I don’t think that’s gonna fit in your crock pot unless you hack it into bits first. And then, what’s the point?

One more thing: Stacy put water in the crock pot when cooking the spaghetti squash, but I’ve cooked 4 pumpkins so far and haven’t used water with any of them. So you can put water in there if you want, but mine seem to cook fine without it.

Simplifying, Twenty-First Century Style

This is a sponsored post written on behalf of Staples. All opinions are mine, of course. (Are there any other?!)

Simplify 21st Century Style As much as I would love to return to a simpler time and a simpler place, I have to admit I would be loathe to give up certain modern conveniences. Like my washing machine, for example. I have absolutely no desire to wash all our clothes over a washboard in boiling hot water, no thank you! Are you kidding me?! The Boys go through so many clothes it’s not even funny. I will even graciously acknowledge that I contribute my own fair share to the wash load. So maybe it would be nice to go back in time about a century… as long as I was one of the lucky people with a washing machine!

But then again, that means I’d have to give up my tablet, which is my new favorite invention. You see, back - oh, about 10 years ago - I was kinda envious about those ladies who had kitchens large enough that they could fit an office type area in the corner. The reason for my envy? I loved that they had such easy access to a laptop or PC right there in their kitchen! It’s been a long time now since I’ve found my recipes and other household how-tos online almost exclusively, and I envied anyone who had it right there at their fingertips whenever they needed it.

Well, I still don’t have a big kitchen, but guess what?! The computers keep getting smaller (and are considerably cheaper than large dwellings with large kitchens) and it doesn’t take an entire office nook to house the all-important portal of all household knowledge (otherwise known as the internet) anymore. My recipes, my meal planner, my inspiration, my fix-it guide, and even my background music all can be held in my hand and set on any (clean… if I can find one) corner of the countertop. It’s almost like my own personal fairy godmother!

In particular, I am speaking of the Google Nexus 7, which Staples sent me to try out in my kitchen. Its size is perfect - larger than a phone, so easier to read a recipe, but small enough to fit comfortably in hand - and the screen is very high quality. I am honestly not so much into the techy details of this sort of thing… all I know is it works and it works well! It’s easy to use, and the battery is long-lasting.

Simplifying With a Tablet

What do I do with my tablet? This list is definitely not comprehensive:

  • Browse Pinterest for ideas and inspiration when I’m not sure what to make for dinner. Or snack. Or beverage. Whenever I’m hungry or thirsty.
  • Use Plan to Eat’s mobile site to help me plan and follow my menu. Which reminds me: I need to get back on that wagon. Oops.
  • Check the Groupon app for eating-out deals when I don’t feel like cooking.
  • Ask Google to find me instructions when I’m not sure what I’m doing (which is usually after I’ve made a mistake trying to do something without the instructions. Ahem.).
  • Pull recipes from my own blog. Why, yes, I do, all the time! Why do you think I post them here, anyway?
  • Access eBook recipes from my Amazon app. Hey, you can even read my book on there! Plus also I can access digital books from our library system and/or reserve print books right from my tablet, how awesome is that!?
  • Keep on top of my life (or try desperately anyway) by using a variety of different calendar tools. I honestly haven’t found one I love 100%; I’ll let you know when I do. If I do. I think my biggest problem is the whole calendar aspect of it, which is sort of hard to get around.
  • Post pics of my successes and failures in the kitchen on Instagram, because, oddly enough, everybody seems very interested in those sorts of things. Who knew?!
  • Fire off Facebook messages to friends and family to get last-minute much-needed info on this that or the other thing.
  • Listen to music on Pandora while I cook, bake, and otherwise putter around in the kitchen.

See why I would be hard pressed to live without my lovely tablet? As much as the turn of the 19th century seems like such a romantic time (those dresses!), I really don’t think I could give up the convenience of my tablet in order to stay there for any length of time. So if anybody can arrange a quick time machine visit, that’d be awesome, but otherwise I’m going to stay put right here in the 21st century. With my tablet in hand!

Do you have a tablet? Have you found it useful in the kitchen? Or have I just made you envious?

Safety Online

I was provided a year’s subscription to Covenant Eyes in exchange for this post, but all opinions and thoughts are my own. This is not a commercial; just my thoughts about a very real problem each of us faces in our world today. CovenantEyes.com Good and evil run on parallel tracks and they both arrive at the same time.

I heard a sermon once where the pastor repeatedly quoted that statement until it was stuck in my brain forever, and I’ve since repeatedly thought how true of a statement it was! The internet is a perfect illustration of its truth: it can be both good and evil.

The Internet Can Be Good

Very good. In fact, I make a little spare change for myself and my family via my little enterprises on the internet. I know many have established entire businesses and careers online to support themselves, and I think it’s so wonderful that they can stay home with their families (both mom AND dad!) and still earn a living. That’s a beautiful thing, in my opinion.

I’ve also learned SO much from the internet: my blogging friends have inspired me time and time again with fresh ideas and challenges on all sorts of fronts, and of course, there’s Google, which is always ready to help you find the answers to burning questions of any level of importance.

I use the internet all the time in planning for my preschool class; I’ve found it to be indispensable!

The internet helps me manage my household, decorate the house, decorate birthday cakes, raise my children, love my husband, keep up-to-date with friends and family, keep up-to-date (to the extent I want) with world events, and find fabulously new recipes.

BUT….!

The Internet Can Be Evil

Very, very evil. Men love darkness rather than light because their deeds are evil, and the internet provides the dark cover of what appears to be a cloak of secrecy that encourages all manner of evil deeds to take place.

Like cyber bullying for example.

Or trapping victims in an online web in order to perpetrate crimes in person.

Or porn. Or any other manner of deviant immoral behavior.

The internet can be evil indeed.

Arm Yourself for Battle

Thankfully, there are ways to reap the benefits of the internet without succumbing to the dangers. Just arm yourself and your family with a the right tools, and you can do battle with confidence!

One important step my family took recently was to install a filtering and monitoring service on all our devices: PC, laptop, phones, and tablets. This service, offered by Covenant Eyes, is completely customizable and adjustable to the particular needs of your family, and gives us a great peace of mind as The Boys get older and are exposed to the internet more and more. I highly recommend that every family take this proactive step to protect themselves against the dangers that can be found online.

There are, of course, other measures families can take, most of them involving a lot of time, attention, and discernment on the part of the parents. My DH and I have discussed at length how we will approach our growing boys’ time online as they get older, and there are various strategies we’ve heard about and read about that we’ll probably implement at one point or another. But ultimately, it comes down to how we train them. I am reminded more and more recently of the instruction God gave to the Israelites to teach their children about His commandments when they were at home, when they were on their way somewhere, when they wake up and when they go to sleep. Our goal right now is to fill our sons’ minds with the Word of God so that when they are older, the Holy Spirit can use it to give them wisdom to know what is right and the courage to do it.

What about you? How do you protect your family from online dangers?


Make Your Oils Go Further with This Simple Solution

Full Disclosure: I am a Young Living Essential Oils Distributor.

Diluted Essential Oils

Not “DEluded”. DIluted. Big difference! Just pointing that out.

So why is “D” for “diluted”? Because today I’m telling you how and why I dilute my oils and why I think you might want to consider doing the same. In the picture above, you see a bottle of Frankincense essential oil, an oil my DH uses every day (which is another story for another day). I’ve marked it with a “D” to help me remember that it’s diluted, so I don’t get it confused with the bottles that have the straight essential oil.

Why I Dilute My Oils

Really, it all boils down to two facts that support each other:

  1. The oils can be diluted and still be effective.
  2. Diluting the oils makes them last longer, which saves money.

In other words, instead of asking “Why should I dilute my oils?”, the question is, “Why wouldn’t I?”. The only time I wouldn’t dilute an oil is if it really doesn’t seem to be working as effectively as the undiluted version. But honestly, if they work undiluted, and it saves money… why not?

Someone also mentioned to me that there is a chance that using the oils undiluted on a regular basis could cause a person to become de-sensitized to a particular oil in much the same way that some people have become de-sensitized to antibiotics because of overuse. There is apparently less chance of that occurring if the oils are diluted. I haven’t had time to research that so I don’t even know if it’s true. I just go back to the previous point… if the diluted oil is just as effective as the undiluted oil, why not just dilute it and bypass the risk?

Another thing for me is that I use the oils quite frequently on my children, and for children the oils should be diluted in any case. Having diluted oils ready just makes it easier to use on whomever, whenever, and wherever the need arises!

How I Dilute The Oils

Essential oils can be diluted in water or in a carrier oil. If I’m wanting to spray the oil, I dilute it in water in a 2-4oz essential oil spray bottle. Usually a few drops of oil in the bottle will suffice.

If I’m wanting to apply it topically, I mix it with a carrier oil, usually jojoba oil because it doesn’t go rancid and it’s good for the skin. Young Living also carries a blend of oils they call V-6, which I have and like but don’t use it too often because it has almond oil and my boys are allergic to tree nuts. If you don’t have nut allergies, though, it’s a great carrier oil. You could also use olive or coconut oil (I use coconut oil with some lavender in it for my son’s eczema).

If you read a book, or browse through websites, or follow the directions on the bottle, you’ll find a whole rainbow of dilution ratios. At the risk of sounding careless, I don’t really bother with those too much. I just know that “hot” oils (like Thieves or Peppermint) need more carrier oil than other gentler oils like Lavender. Generally speaking, 5-10 drops of oil in a tablespoon of carrier oil will be plenty and you could probably even use less. If one of my boys has a cold, for example, I swirl about a tablespoon of carrier oil into an opaque container that has a lid, add a few drops of whatever essential oil I want to apply on them throughout the day, close the lid and shake it. That amount will last for a couple days of frequent generous application.

Storing Diluted Oils

I wouldn’t keep the diluted oils forever, especially if they’re made with carrier oils that go rancid, like olive oil. In fact, I wouldn’t store them long-term in any case. Generally speaking I only dilute the amount I plan to use over the next few days in the method I described above.

However, for some oils that we use on a regular basis - like lemon and frankincense - I love this little trick that a friend taught me. Once I have an empty or near-empty bottle of essential oil, I fill it part way with the essential oil on the label (so as not to get confused and also so as not to mix the oils) and top it off with a carrier oil. For example, the bottle in the above picture is a bottle of Frankincense that was almost empty. I added a little more Frankincense until it was about 1/3 of the way full, and then filled the rest with the V-6 oil. I put the dropper back on, screwed on the cap, and wrote a big “D” on the top so I know that this bottle of Frankincense is diluted. I love the simplicity of this little system, and do the same thing with lemon and lavender oil, which we also use quite frequently.

When Not to Dilute

Now don’t go around your house diluting ALL your essential oils! The dilution is only for topical application purposes. You’ll want some straight essential oils to use in your household cleaning, or to make various concoctions like bug spray. You’ll also want to use undiluted oils in diffusers, so make sure you keep undiluted versions of all your essential oils on hand to use in whatever way you need them.

For more information on essential oils, visit my Young Living website here. And of course, please do keep in mind that I’m not a doctor or a medical expert of any kind and I’m not offering medical advice. Just sharing what I do in my home!

Honey Fondant: The Healthiest Easy Fondant Recipe You’ll Find Anywhere

I love making fun birthday cakes for The Boys - I actually really look forward to it from one birthday to the next! The problem is trying to balance cost, nutrition, and simplicity - those three things don’t always meet together and play nicely when it comes to cakes and decorative frostings! Fondant, in particular, seems to be a matter of expense, difficulty, and chemical-laden ingredients, yet it can turn out some of the cutest and most gorgeously decorated cakes.

However, for my Certain Little Someone’s fifth - yes, fifth! - birthday cake, I happened upon an amazing recipe for fondant that contained absolutely no chemical or processed ingredients. What’s more, all the ingredients were something I had in my cupboard already, and it was just as easy - or seemed to be - as any other fondant recipe out there.

A Healthy Fondant Recipe that’s Easy?

Here’s how I stumbled across this gem of a recipe:

  • My Certain Little Someone wanted Mario cupcakes for his birthday (which he later switched to Angry Birds). When I was browsing Pinterest for ideas, most of the ones he liked involved fondant, which I had never used before.
  • I took a gander at the ingredient list on the label of store-bought fondant. My eyebrows rose so high they practically rocketed off my forehead, and I hastily put the container back on the shelf and said, “No way!”.
  • I found a healthy-ish recipe for marshmallow fondant, but when I priced the ingredients…. well, once again my eyebrows got a little too high and I reluctantly admitted that was not do-able. Those “healthy” marshmallows cost $4 a bag, and you need two for the recipe! Not to mention the cost of the healthier sugar/powdered sugar.
  • I started researching alternative fondant recipes - my goodness, there are a lot of different ways to make fondant! Who knew? Not me, that’s for sure. There was the original true recipe for fondant, which involved candy thermometers and boiling sugar water, which I decided against (way too complicated, plus I don’t have a candy thermometer). There were also a lot of recipes that called for strange ingredients I don’t keep on hand and didn’t really want to invest in anyway.
  • Then there were a whole variety of powdered-sugar based recipes, most of which involved corn syrup. I wondered if honey could replace the corn syrup (because that’s what I usually sub when corn syrup is called for in a recipe and it usually works well), but I didn’t want to risk it because I didn’t have the time to deal with it. I searched specifically for “honey fondant” wondering if someone else had tried it and if it worked.
  • Well, whaddya know?! I found a whole bunch of recipes for something that beekeepers feed their bees during the winter (no, thank you, I don’t have any bees) instead of more fondant frosting recipes… but there was ONE little precious gem of a recipe buried in all of that honey-bee stuff: Honey Fondant.

I made it pretty much as written, except that I had to add significantly more powdered sugar than I was expecting. Like, I mean, significantly, she says with significance. I honestly don’t know how much powdered sugar ended up in this batch of fondant, but let me tell you it is way more than I have ever put in any one recipe any other time in my life.

So I decided that when it comes to fondant, your choice pretty much boils down to this:

chemicals

or

sugar.

Lots and lots of sugar.

I’m glad I want with the sugar option because at least it’s something your body recognizes and knows what to do with. The chemicals are just scary, frankly - at least sugar is a known danger!

I haven’t made any other kind of fondant so I have nothing with which to compare it, but this seemed to be just as simple as any of the other recipes out there, and definitely simpler than the boiling sugar version. As long as you understand you might have to use a metric ton of powdered sugar, you’ll be OK.


A few ingredient notes:
  • The original recipe called for margarine - I would have used butter except that my Certain Little Someone is allergic to it. I considered using palm shortening but I wasn’t sure if that was a good sub or not (probably would be fine), so I opted to stick with the original recipe and use my Certain Little Someone’s “butter”, which is actually a coconut-based all-natural butter-like spread. I think either butter or palm shortening or some other similar margarine would work. Just don’t use the nasty chemical margarine.
  • The next time I make this, I’ll probably try starting with less liquid, maybe even half as much as is indicated here.
  • I made my own powdered sugar by processing raw sugar in my Vitamix. I wanted it to be pretty fine, or I would have gone with powdered sucanat or even coconut sugar. Either of those would probably work, but with the quantity used, it would get expensive fast.
  • The original recipe called for 800g of powdered sugar, which is just under 2 lbs. I’d definitely consider that a starting point! You’ll probably use more like 4 pounds, maybe even more, unless you adjust the liquid (if you do adjust the liquid, let me know how that goes!).

Interesting reads